Octa-core Superphones: When a Single Core is just not enough!

I was surprised to hear that the Samsung Galaxy phones will have an Octacore processor (a processor with 8 cores). A smartphone is essentially a computer – like our home computer. What do we really do on a home computer? We surf the Internet, create documents, and play movies. Among other components, a computer contains a Central Processing Unit (CPU) to perform all these tasks. Traditionally, older CPUs had a single core.

What is a ‘Core’, really? As a non-technical end-user, why do I really care as to how many cores the CPU in my smartphone has? Before answering these questions, let us talk about something else:

How does a motor vehicle with an internal combustion engine work?

Scooters have an internal combustion engine with a single cylinder, piston, and a spark plug.  When fuel is injected into the cylinder, the spark plug creates a spark and the explosion pushes the piston. Consequently, the scooter moves forward. With a single cylinder comes a limited amount of power. In comparison, the engine of a car has four cylinders. Four cylinders give more power than a single cylinder. More interestingly, the work is equally divided amongst the four cylinders. As a result, one cylinder is not overloaded and one cylinder never overheats.

Let’s compare the processor with an engine and the core with a cylinder.

The biggest challenge chip designers face today is the inefficiency of a CPU in terms of heat emission. Like single cylinder engines, CPUs with a single core produce a lot of heat which makes them inefficient in terms of power consumption. To solve this problem, chip designers created a multi-core processor (like the multi-cylinder engine). The processing is divided between multiple cores thereby reducing heat emissions and consequently reducing power consumption. It is common to see dual-core or even quad-core processors in computers today.

cpu

So far, phones usually had a CPU with a single core. With the launch of Samsung Galaxy, we are entering a new era of smartphone computing. The Samsung Galaxy S6 has an Octa-core processor (8 cores). Why does a smartphone need so much power? When a home computer can do everything with a slower processor (and single core), why does a smartphone need a faster processor (with 8 cores)?

The Samsung Galaxy has the following components that a home computer or even a basic business computer does not have:

Smartphone_Sensors-1

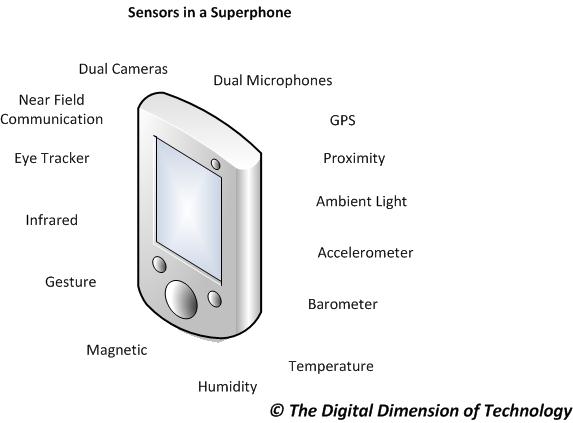
  • GPS tracks your location.
  • Proximity Sensor turns the screen off when you hold it to your face.
  • Ambient Light Sensor automatically adjusts brightness.
  • Accelerometer senses movement and orientation.
  • Barometer measures pressure.
  • Temperature Sensor measures the temperature.
  • Humidity Sensor measures the humidity.
  • Magnetic Sensor measures the magnetic field.
  • Gesture Sensor senses your hands to navigate.
  • Infrared Sensor turns the phone into a remote control.
  • Eye Tracker pauses video when you look away.
  • NFC (Near Field Communication) shares data by touching two phones and also enables mobile payments.
  • Dual Cameras are available; one on the front and one on the back of the phone. Both cameras can record simultaneously in the Samsung Galaxy S6.
  • Dual Microphones are used in the phone; one microphone for voice and the other to listen to the ambient noise and create anti-noise using the noise-cancelling system.

These sensors constantly gather large amounts of data and need constant processing. A CPU must have multiple cores to compute all this data simultaneously. The CPU assigns tasks to different cores, keeping a single core from overheating. Less heat is generated and hence, less power is consumed.

With battery technology not evolving as fast as CPUs, manufacturers don’t have a choice but to make CPUs that are  more efficient in terms of power consumption and heat emission. Unless better batteries are developed, smartphone manufactures will strive to use better processors with each new model to remain competitive. (You might want to read more about my idea on battery technology in my earlier post Is the Smartphone Industry Curious about Curiosity?.)

Next time you use your smartphone, you might want to count the number of sensors it has. It would be really interesting to see how many of us are able to identify all the sensors on our smartphones!

Advertisement

Going beyond the device: Expanding the horizons of Super Zoom

Have you ever pushed your device to the limit? Have you ever made your device do what it was not meant to do, like over-clocking your CPU or Jail-breaking your iPhone? I just did something like that. Only it’s something much safer than over-clocking or jail breaking. And I did it to my camera.

I have been using a Super Zoom camera for a while now. A super zoom camera comes with a lens that can go from a Wide Angle to Super Zoom. The Canon SX 40 HS is a good example as it can go from 24mm (wide angle) to 840mm (super zoom).

There are some advanced features that are not available in a Super Zoom. One of the most important missing features is a Remote Shutter Release option. Some DSLRs come with a Wireless Shutter Release option where you can mount your camera on a tripod and take the picture without touching the camera.

Many a time I’ve really really needed a Remote Shutter Release option. For example, when I take photos of the Moon/Super Moon or when I take artsy pictures at night. My super moon picture:

Downtown Vancouver at night:

[For more photos, visit my Photo Blog]

In such cases, I have either zoomed in quite a bit, or am taking the picture in low light conditions. The slightest shake translates into a very bad picture. To avoid shaking the camera in such cases, I usually activate the 10 second timer. But there is some residual oscillation (shake) which sometimes messes up the photos. Reading the camera’s user guide told me that that there was no inbuilt no Remote Shutter Release option available. I also visited many specialty camera in the hope of finding an external device that could act as a remote shutter release. To my utter disappointment, I could not find such a device.

Then, one fine day, I discovered CHDK – Canon Hack Development Kit. This is an open source community that creates programs for Canon cameras to add capabilities in addition to the existing features, for example, a Remote Shutter Release option. So, I decided to build my own Remote Shutter Release kit. Here’s what I did:

(A) Installed CHDK on my camera (the easy part)

To install CHDK:

  1. Go to the http://chdk.wikia.com/wiki/CHDK
  2. Check the firmware version on your camera.
  3. Download the correct build based on the firmware version. Unzip it on your computer.
  4. Copy the CHDK files on the SD card.
  5. Insert the SD card in the camera and press the Review button.
  6. Go to  Menu and update the firmware.

The program is loaded into the memory temporarily. When you shut off the camera, it is removed from the memory. The program does not interfere with the manufacturer’s original firmware. CHDK also provides a detailed user guide.

(B) Created a physical Remote Shutter Release device (the most difficult part)

I searched the Internet and discovered that I have to build a remote shutter release device on my own. I found a great video of a camera user who had built a shutter release device from scratch. I could not follow the same path since I am not as tech savvy. Imagine the trouble if I were to solder a diode onto a circuit!. Moreover, being a technical writer by profession, I believe in simplicity. I wanted a solution that was simple, easy to implement, easy to use, and of professional quality. I could not build a remote shutter release device, and nobody sold one for my camera. It seemed like a dead end.

Numerous searches on the Internet provided no answers. However, I discovered a few things that helped me create a solution for myself:

  • Send > 4V on the data port of the camera to release the shutter.
  • A very high voltage (> 8V) might damage the camera!

I performed some trial-and-error experiments and discovered a very simple solution for the problem. I used the following readymade components:

  • Duracell USB Battery Backup: I used the Duracell USB Battery Backup to experiment with the Remote Shutter Release feature of CHDK. The Duracell USB Battery Backup is rechargeable, has an ON/OFF switch, and is slightly bigger than a matchbox. It has a USB (output) port for charging external devices and a mini-USB (input) port for charging the backup battery.

  • Mini-USB cable: I used a mini-USB cable for the solution. You can easily use the data cable that came with the camera.

(C) Made the hardware and software work together

To make the hardware and CHDK software work together:

  1. Install CHDK on the SD card and update the Firmware [as explained in (A) above]. Once CHDK is in the memory, go to the CHDK menu and enable Remote Shutter. (Print button + Menu button displays CHDK menu.)
  2. Connect the mini-USB cable to the camera’s data port and the other end to the USB port on the Duracell USB Battery Backup.
  3. Switch ON the Duracell USB Battery Backup and Switch OFF immediately. The camera focuses.
  4. Switch ON the Duracell USB Battery Backup and Switch OFF immediately again. The camera releases the shutter!

And I am sure this solution will not damage the camera. Here’s the simple reason why: The camera is designed to use a mini-USB cable that is connected to a computer’s USB port (which has a ~4V output). The Duracell USB Battery Backup also has the same output since it is basically a USB port without the data transmission capabilities.

I was amazed that another device could work as a remote shutter release for a camera that was not built to use one! Amazon, eBay, camera stores, and photography forums did give me ideas for creating this seemingly simple solution. So I thought I must share this discovery with all the other Super Zoom users out there that are also looking for something similar.

Happy Super Zooming!

More information about the Duracell USB Battery Backup: http://www.duracell.com/en-US/product/instant-usb-charger.jspx

Update: May 12, 2012: If you want to use a clicker-like device, the iGo Anywhere USB Micro/Mini Charger would be ideal. Instead of a switch, you could use the button to release the shutter. For more information about iGo Anywhere USB Micro/Mini Charger, visit the Source website here. I tested it out and it works perfectly fine.

DSLR vs. Super Zoom: A user’s dilemma

When my regular point-and-shoot died, I was faced with a dilemma of whether I should go for a DSLR or a Super Zoom camera. When I was analyzing the differences between a point-and-shoot, Super Zoom, and a DSLR, the following information confused me the most:

  • Point and shoot: 10 Megapixels
  • Super Zoom: 10 Megapixels
  • DSLR: 10 Megapixels

How could three different cameras, with varied features, give the same 10 Megapixel output? (What is a Megapixel, by the way?)

I found it prudent to approach this confusion with some logical reasoning. Obviously, I needed some answers before I could pick a camera. I was looking for simple information, which was hard to find on the Internet. The information available on the Internet had too many technical details (ISO, f –stops, crop factor, depth of field) and jargons (Single-lens reflex, APS-C sensor, micro four thirds). The information available on the Internet is aimed at people who understand the nuances of photography and not end-users. Being an end-user, I wanted to cut through the jargon.

Some of the questions that I needed answered were:

  • What is a DSLR or a Super Zoom camera? (without too many technical details)
  • What are the main characteristics of each camera?
  • How are they different? (without the jargon)
  • Which one will best suit my needs?

(A) How is an image created in a digital camera?

Before going into camera types, let us look at how an image is created in a typical digital camera:

  1. Light: The essence of a photograph – light falls on the object.
  2. Object: The inspiration behind the photograph – the object, which is being photographed, reflects light onto the lens.
  3. Lens: The eye of the camera – light enters the lens.
  4. Shutter: The gatekeeper – the shutter opens for a fraction of a second to let the light in.
  5. Sensor: A Pixel is born! –light falls on the sensor and is converted into pixels. A pixel is 1 unit of the photo captured by the sensor. A photo is made up of many pixels (and hence the term Megapixel which is equal to one million pixels). Cameras had films in the past, which has now been replaced by a sensor.
  6. Processor: A byte born! –pixels are analyzed by the processor and converted to data (bytes).
  7. Storage: The photo is saved – the photo is stored as data on the memory card or internal camera memory.

Now, let us talk about different types of cameras – DSLR and Super Zoom.

(B) What is a DSLR?

A DSLR has the following characteristics:

  1. Shutter – A DSLR has a mechanical shutter. When you press the shutter release button, the shutter opens for a fraction of a second to let the light in. Anything that does not have a mechanical shutter is not a DSLR. The DSLR gives out a loud Clack sound when you press the shutter release button.
  2. Interchangeable Lenses – A DSLR has the feature of interchangeable lenses. You can use a Wide Angle lens (18-55mm) or a Zoom lens (100-300mm) depending upon your requirement. For example, if you want to shoot a large landscape view of a mountain, you could use a Wide Angle lens. If you want to go closer to an object, you could use a Zoom lens.
  3. Larger Sensor – DSLRs typically have larger sensors.

(C) What is a Super Zoom (also known as Bridge or a Hybrid Camera)?

A Super Zoom camera has the following characteristics:

  • Electronic Shutter – Super Zoom cameras do not have a mechanical shutter. The shutter is entirely electronic.
  • Single Lens – Super Zoom cameras have a single lens that can go from 24mm (Wide Angle) to 840mm (Super Zoom – and hence the name). You cannot change the lens.
  • Smaller Sensor – Super Zoom cameras have smaller sensors than a DSLR.

Super Zoom is also called a Bridge camera since a user moves from a point-and-shoot to a Super Zoom and then a DSLR. Since the Super Zoom basically, acts as a ‘bridge’ between the two types of cameras, it is called as Bridge. Also, Super Zooms have excellent lenses (comparable to entry-level DSLRs), but smaller sensor sizes. Since they perform like a point and shoot with some characteristics of a DLSR (good lens), they are also called Hybrid cameras.

(D) What is the difference in quality of photos between DSLR and Super Zoom?

With all the above information, I was still unable to figure out the exact difference between a DSLR and Super Zoom. Assuming the DLSR uses the same lens as a Super Zoom (to compare apples to apples), what does a larger sensor actually mean if both cameras are 10 Megapixels?

Here’s how I understand it – a DSLR has more definition per pixel.

Simply put, when both DSLR and Super Zooms are rated with the same Megapixel count, the DSLR has a larger surface area on the sensor to define the same pixel. Theoretically, if you had to pick out 1 pixel from a photo taken by a DSLR and a Super Zoom, the pixel from the DSLR would have more information about the image.

Let us compare the difference in definition between a DSLR and a Super Zoom to today’s Web and Social Media tools. Let us say I wanted to tell the world the difference between a DSLR and Super Zoom. I could do it in the following ways:

  • Send a Tweet in 140 words.
  • Write a Blog post in 500 or more words.
  • Create an entire Website containing 50 pages with 500 words per page.

I am saying the same thing, but in three different ways. I am getting the same message across, just in different depth. Similarly, a DSLR gives you maximum definition per pixel simply because it is able to capture more information with its larger sensor. A Super Zoom gives slightly less definition for the same image by capturing slightly less information on its smaller sensor.

A DSLR undoubtedly has the best picture quality since it packs more definition per pixel.

(E) Advantages and Disadvantages of a Super Zoom

After a lot of consideration, I finally decided to buy a Super Zoom Camera. Based on my analysis, the Super Zoom had some distinct advantages over DSLRs. The Super Zoom also had quite a few disadvantages when compared to DSLRs.

Advantages of a Super Zoom camera:

  • Compact – easy to carry around. Good for travel.
  • Cheaper – way cheaper than a DSLR.
  • Single lens – you don’t have to buy multiple lenses. You can easily go from 24mm (Wide Angle) to an 840 mm (Super Zoom). Considering the cost of multiple lenses and the inconvenience of carrying an entire bag just for lenses, the DSLR does not make sense.
  • Never lose the moment – since you can quickly go from wide angle to super zoom with the same lens, you need not fumble around for lenses and miss the moment. For example, you can capture portraits, macros, birds, or high-speed boats with equal ease!
  • Great picture quality – good for digital publishing and small-size printing.
  • Easier to maintain – dust particles entering the sensor when you change lenses is one of the greatest drawbacks of a DSLR. Since a Super Zoom has one fixed lens, there is no question of dust entering the sensor.

 Disadvantages of a Super Zoom camera:

  • Smaller sensor – Less definition per pixel. Therefore, you cannot magnify photos like you can in a DSLR. If you plan to print poster-sized photos, a DSLR is the best option.
  • Single lens – A one size-fits all lens can only do so much. Having a portrait and landscape lens helps in a better picture quality, which a Super Zoom can only try to match.
  • Less features – There are some advanced features in a DSLR that are not available in a Super Zoom. For example, a wireless remote shutter release is not available in a Super Zoom.

As far as I am concerned, I am really happy I decided to go with a Super Zoom (a Canon SX 40 HS). Whether you want to buy a DSLR or a Super Zoom really depends on your requirement, taste, budget, and how likely you are to carry the camera around. I hope this information helps you decide whether to go for a DSLR or a Super Zoom.

To see photos taken using my Super Zoom camera, visit my Photo Blog.

Simplicity. Stability. A Technological Marvel!

I was looking for an operating system that is extremely stable, required less processing power, worked on low memory, never crashed, and was very easy to use. Having used Mac OS X, Windows 7, and iOS, my expectations were extremely high. I was thrilled to discover an operating system that was simpler, better, faster, and more stable than the other operating systems I had used.

Around four years ago, I stumbled upon Ubuntu. Ubuntu changed the way I looked at operating systems. Ubuntu combines the power, stability, and security of a Linux operating system with the ease of use of Mac OS X, Windows 7, and iOS.

Ubuntu can easily revolutionize home computing, or even small business computing. Here’s why:

Simplicity

Ubuntu is extremely easy to use. A user, with absolutely no knowledge of computers, can easily start using Ubuntu. For home computing, all you need is a stable system, an excellent browser, and Office programs. Ubuntu provides all that – and more. A few years ago, I was impressed with the Apple App store that made installation very simple. Ubuntu goes farther than iOS in ease of App installation.

Stability

Firstly, Ubuntu worked smoothly on my old laptop with just 128 MB RAM and a 133MHz Celeron processor. Secondly, Ubuntu never crashed and never corrupted the installed programs. Finally, Ubuntu was inert to viruses, malware, spyware, botnets, and ransom-ware. My computer worked perfectly for many years. In fact, this is my third computer running Ubuntu.

Here’s a quick tour of Ubuntu for Netbook.

Ubuntu Desktop:

The ubuntu desktop is very clean to look at. The icons on the left give ready access to various frequently used programs. The top menu bar allows you to access advanced configuration options and various tools.

20120501-225007.jpg

Menu for Communication

The menu allows you to chat or launch an email program. You can use ALT + TAB to navigate between programs (just like Windows).

20120501-225130.jpg

Menu for Connections:

The menu allows you to connect to Wireless or Ethernet with additional connection options.

20120501-223732.jpg

Menu for Exploring the Computer:

The explorer menu helps you navigate the computer or the network right from the Desktop.

20120501-223941.jpg

Open Office: Writer

Open Office is an open source (free) program that is very similar to Microsoft Office. This program is very useful to the home user or small business. Open Office works pretty well and is extremely stable.

20120501-224108.jpg

Dashboard:

The dashboard allows you to navigate to other programs on the computer. Just move the mouse over the Dashboard icon, and additional options appear.

20120501-224418.jpg

Installing Applications:

This feature beats any know operating system – even iOS. Ubuntu displays the programs Most Frequently Used, Installed, and Apps Available for Download. Unlike Windows, you don’t have to open a browser, search the Internet, download and then install the applications. Most available applications are readily displayed and can be installed directly from list!

20120501-224528.jpg

The Cloud: Ubuntu One

Ubuntu is futuristic. Ubuntu provides a cloud to store your files.

20120501-224631.jpg

Ubuntu is an amazing operating system that can help home and small business in the following ways:

– Save money on software licensing
– Use existing hardware instead of upgrading
– Security (a UNIX core is very secure)
– Stability (a very stable operating system)
– Install Free (Open Source) programs like Open Office
– Simplicity and ease of use (easier than Windows or Mac OS X!)
– All drivers available (printer, webcam, and other drivers work fine)

Is it time to abandon Windows and Mac OS X?

(If you want to try Ubuntu without going through the trouble of installing it first, you can do so at the live Ubuntu demo: http://www.ubuntu.com/tour/en/)

Where the Worlds Collide: Smartphones turn into Desktops (or SmartTops*)

The past decade has seen more technological innovation than the past century – at least in the world of mobile computing. Netbooks, Smartphones, Tablets, and finally Phablets have revolutionized the world.

A new phenomenon is emerging – where Smartphones are turning into desktops. Sounds funny, doesn’t it?

Consider this: What’s the configuration of your smartphone? Most likely, it’s a dual-core processor with at least 2 GB RAM, and a 32 GB of disk space. Good examples are an iPhone 5 or a Samsung Galaxy S3. What’s the configuration of your home computer? Most probably, the processor is lesser than a dual-core, with 2 GB RAM, and a large hard disk. Putting all of these together, your smartphone today may as well have more processing power and memory than your basic home computer.

Yet, we have a home computer, for general Internet surfing, printing, or for things that you can’t yet do with your smartphone. And yet, most of us carry a smartphone.

Here’s a revolutionary idea: What if your smartphone could also be your home computer?

And this revolutionary idea comes to you not from Apple or Google, but from Canonical, the guys that brought you Ubuntu. Canonical has released a developer version of Ubuntu for Mobile. You can load this operating system on your smartphone. You can connect your smartphone to a dock to switch to Desktop Mode. You can then use your smartphone as a desktop computer simply by connecting a mouse, keyboard, and monitor to the dock. After using your Smartphone as a Desktop, just unplug it and put it in your pocket!

Here is a conceptual representation of the setup:

Ubuntu_Mobile

Intriguing? I think so. Here’s where you can read more about Ubuntu for Mobile: http://www.ubuntu.com/devices/phone

In my opinion, here are some advantages of using a single device (for a home user):

  • Programs: Install all software programs on only one device..
  • Data: Store your data on only one device (may also be synced to a cloud).
  • Mobility: Carry the device around.
  • Security: Manage security for only one device (anti-virus, anti-spyware, anti-malware, theft protection etc.)
  • Cost: Cheaper, since there is only one device to buy.
  • Software Updates: Update software on only one device.
  • Space: Saves space in your home.
  • Environment friendly: Save power and creates less electronic recycling.

Here are some advantages of using a single device (for a business):

  • Mobility: Welcome to the mobile enterprise – all employees are mobile.
  • Mobile Device Management: IT administrators can now use Mobile Device Management instead of Desktop Management solutions (the desktop market is shrinking anyways).
  • Licensing: Save on licensing costs for expensive programs.
  • Unified Threat Management: Unified Threat Management on only one device – a boon for IT administrators.

I would love to have an Ubuntu Smartphone that is also my home computer.

In all fairness and much as I love the concept, there are some serious disadvantages to using an Ubuntu phone as a computer:

  • Processor Speed: Can we have a processor that is as fast as Core i7 on a Smartphone? Not yet.
  • Memory (RAM): Smartphones are yet to reach the 8 or 16 GB category.
  • Network Speed: Smartphones do not have Gigabit Ethernet. Ethernet ports are still very useful when it comes to communicating over high-speed networks.
  • Battery Technology: How reliable are smartphone batteries? Obviously not as reliable as a desktop computer that is plugged into a power line. (You might want to read more about my idea on battery technology in my earlier post Is the Smartphone Industry Curious about Curiosity?.)
  • Applications/Programs: Finally, the obvious – Ubuntu for Mobile may not have as many programs as Windows. Windows still rules the market with millions of programs, drivers, and tools for business.

I guess technology has reached a full circle from Desktops > Laptops > Netbooks > Smartphones > Tablets > Phablets > finally to SmartTops*!

Let’s wait and watch to see if SmartTops* rule the market like Smartphones or Tablets.

*SmartTop is not an industry terminology. I came up with this term for this blog post. Remember, you heard this word here first. Ubuntu for smartphones may get in touch with my $$ anytime soon 🙂


Apple Maps vs. Google Maps – a user’s perspective

When Apple decided to abandon Google Maps and create its own, users expected Apple to create the next generation mapping product. However, when Apple launched its maps with iOS 6, there were reports of multiple errors in Apple Maps. Collapsed bridges, wrong names, and non-existent landmarks were a few errors blown out of proportion by the media.

Do Apple Maps really suck? Are the maps unreliable? As an iOS 6 user, would I get lost without Google Maps?

The only way to answer these questions is for me to compare both maps using a user-centric approach. I decided to analyze the route from place A to place B using both maps. For my test, I chose two well-known landmarks in the Vancouver Lower Mainland, that is starting from the Metropolis at Metrotown Mall to the Waterfront Skytrain Station.

Apple Maps: Here is the route displayed by Apple Maps:

20120930-201318.jpg

The map view looked alright to me. However, to be more accurate, I looked at the list view:

20120930-201444.jpg

What I liked about the Apple Maps (list view) was that Nelson St, Hazel St, and Miller Ave were displayed. Depending upon where exactly the user was, one of the streets would be visible within 100-150 meters. Apple maps took me through the Dunsmuir viaduct and finally Cambie St, Pender St, and Seymour St directly into Downtown Core. As a person who lives here, the route looked alright to me.

Google Maps: Here is the route displayed by Google Maps:

20120930-202205.jpg

Let us see the Google Maps route using the list view:

20120930-202307.jpg

Apple Maps seemed to be taking a slightly different route, but at first glance, neither route is glaringly incorrect. Google Maps was taking another route via Main St and Hastings St to Seymour St and finally to Downtown Core. In the Google Maps route, the first step struck me as strange. Google Maps tells the user ‘Head Northeast’. How is the user supposed to know what Northeast is? Unless the user is holding a compass, it is not user-friendly to say head in a particular direction.

Both routes are correct. However, here are the differences:

Apple Maps:

  • Specifies each street right from the start to the end. Does not say head ‘in a particular direction’.
  • Gives turn-by-turn navigation via large, unmistakeable labels on the map.

Google Maps:

  • Says head Northeast at the start of the route. Pointing users in a direction rather than towards a street, in my opinion, is not user-friendly.
  • Provides street-view, showing users exactly where they need to go.

Aside from the above differences both Apple and Google maps seem to be quite accurate. Considering the fact that Apple Maps is just the first version and the error-reporting is crowd-sourced, I am sure the accuracy of the maps will improve as users use them more and more.

As for the errors like collapsed bridges and non-existent landmarks, Apple has no option but to fix them as soon as possible.

(Edited by Prarthna Sri)


Is the Smartphone Industry ‘Curious’ about Curiosity?

The world holds its breath as the next battle for dominance in the smartphone industry begins with the launch of the Samsung Galaxy S4. Apple recently defeated Samsung in a patent lawsuit involving user-interface elements. Samsung lost the battle, but they don’t necessarily have to lose the war. Samsung will not fade away into the night without putting up an aggressive fight. Samsung plans to sue Apple on its using the LTE (a technology for faster data speeds called Long-Term Evolution) chip in the iPhone 5.

As the smartphone war rages on, it is evident that there are many areas where industry giants compete for dominance – user-interface, operating system, physical design, connectivity, storage, and camera.

But there is one area where companies haven’t done much – the battery. Until the smartphone industry invests heavily into battery technology, devices are limited to what they can do on a single charge. Lithium-ion batteries are used extensively in all smartphones as of today. The life of a single charge is a few hours (assuming a user talks, texts, and uses data connections such as Wi-Fi or 3G/LTE). After a smartphone runs out of battery, users have no option but to carry a charging cable, USB charger, portable USB charger, a battery pack (like Mophie), or just wait to reach home to charge the phone.

Talking about battery life, the smartphone industry can learn a lot from the Mars Rover Curiosity. Curiosity has reached Mars and has starting sending photos, conducting experiments and, exploring the Martian mountains. For doing all this, Curiosity needs one thing – power.

Previous generations of Mars Rovers used solar panels to power various devices. However, dust settled on the solar panels making them inefficient. Also, note that the Sun looks much smaller from Mars as Mars is at a greater distance from the center of the solar system. Smaller sun = less light = less solar power.

To solve this problem of inefficient solar power, Curiosity uses a Multi-Mission Radioisotope Thermoelectric Generator (MMRTG). Simply put, Curiosity uses the radioactive isotope Plutonium-238 as the raw material. Heat is automatically generated due to the natural decay of Plutonium-238. A device called a Thermocouple uses this heat to generate electricity. The Plutonium-238 is well shielded, and the heat – and not the radiation – is used to generate electricity. This device can last for 14 years without requiring any maintenance! Curiosity will constantly receive its power until Plutonium-238 completely decays.

Now, coming back to the smartphone industry, why can’t we design something like this for smartphones? Imagine having a very small amount of radioactive isotope that is well-shielded and attached to the smartphone. The device could then, theoretically, produce electricity for at least a year (or more!). Instead of battery packs like Mophie, we could have smartphones that generate their power and don’t need a recharge! Depending on the stability of the technology, we could have a smartphone that could last for years without a recharge. You buy a smartphone and dispose of it after a few years without charging it even once.

When I told my wife about this idea, she said, and I quote: ‘I am not carrying a nuclear bomb in my pocket!’. Well, what I am proposing is not exactly a nuclear bomb since there is no chain reaction like nuclear fission or nuclear fusion going on. The natural decay of Plutonium-238 generates heat and hence the power. Theoretically, a well-shielded pack of Plutonium-238 is safer than batteries that we have today. The current batteries have greater chances of exploding than a well-shielded pack of Plutonium-238!

The future of the smartphone industry is uncertain. There are no obvious winners as of today. In my opinion, only the company that designs and patents advanced battery technology will emerge as the winner. The company holding the key to advanced battery technology will be the undisputed winner and will rule the smartphone industry for generations to come. Simply because, more power equals to more things the smartphone can do without dying.

Hey Apple and Samsung – are you listening? Hopefully, I can expect to be paid a billion dollars for my idea!

(MMRTG Source: http://mars.jpl.nasa.gov/msl/mission/technology/technologiesofbroadbenefit/power/)

Edited by: Prarthna Sri

Auditing in a touch-screen world!

Every time I inspected a home before renting it out, or even before buying it, I wish I had a quick checklist of repairs or cleaning required. In the absence of a checklist, there was no perfect way to record the defects in a house. Not having a checklist would lead to problems later – if both parties do not agree to defects. For example, you may have to pay for the stain on the carpet that was not your fault.

I found this amazing app called iAuditor. The iAuditor has a few built-in checklist that can be filled out using an iPad or an iPhone. The UI is a very simple and intuitive:

20120430-011328.jpg

I started a new Audit. The App has a few built-in checklists (you can also create your own customized checklist):

20120430-011531.jpg

I decided to try out the Accommodation Inspection Checklist:

20120430-011632.jpg

The checklist has the following options: Yes, No and Not Applicable. Selecting No gives an option to directly add photographic evidence of non-compliance by clicking the Camera icon.
20120430-012911.jpg

There is also an option to add additional comments. An interesting feature of the App is the option for both parties to add signatures directly from the iPad!

20120430-012104.jpg

Once both parties have signed on the Audit checklist, the App gives an option to directly export to PDF. This is how an exported PDF looks:

20120430-012246.jpg

As a Technical Writer, I am extremely impressed by the perfectly formatted PDF output. I can imagine hundreds of good uses for this App in business. The following uses come to my mind:

– Safety Inspection
– Regulatory Compliance
– Manufacturing
– Pharmaceuticals
– Construction
– Real Estate

In addition to the above business uses, this App can be used in personal situations as well.

The next time you check out a home for rent, make sure to carry your iPad or iPhone. Using the iAuditor App, carefully track the defects that need to be fixed. If not, don’t be surprised if you are dinged for a stain on the carpet that existed before you moved in!

Milk, Diapers, and an iPad

During my recent visit to the Apple store, I saw Apple experts demonstrating an iPad to a group of kids and their parents. I increasingly see kids holding iPads instead of toys. An iPad is expensive, and fragile. I was curious see how a 2-year old could use an iPad. Most importantly, I was also curious to see if an iPad App was simple to use for a kid.

I downloaded Crayola Paint and Create – a free App for the iPad. I was interested in studying the features, user interface, user interaction, and the overall user experience. This is how the App looks:

20120421-192410.jpg

The main elements were Coloring Pages, Fun Activities and Free Draw. I decided to use Coloring pages and color a drawing:

20120421-192638.jpg

I clicked the Crayola icon at the bottom of the screen to display various types of crayons with different colors. You can see the following icons on the right: Pause (to pause the movements like snow falling or pause other interactive elements), Undo, Redo, New, Settings, Share (to share via email or on Facebook), Help, and Exit.

20120421-192912.jpg

This is how a partially colored coloring page looks:

20120421-193208.jpg

I could easily use different colors and fill different parts of the page with solid colors. This is how a fully colored page looks:

20120421-193451.jpg

The app is configured to use a finger by default. There is also a setting to use an iMarker instead of a finger (an iMarker is like a pencil that can be used with the iPad). Obviously, the Help and Settings are a little complicated for kids since they may not be able to read. Apart from Help, Settings, and Share, the other options were extremely easy to use.

What is Apple’s strategy to promote iPads for kids by launching a Kids Corner in the Apple store? What is the value proposition for parents to purchase such and expensive device for their kids? Here’s what I think:

Get an Apple user for life – That’s right. Catching them young will ensure they are Apple users for life! Kids will never choose an Android device or another tablet if they are introduced to the iPad at the age of 2. Apple’s strategy of catching users at a very young age will lead to huge revenue for years to come.

Reduce cost per user – The cheapest iPad costs approximately 400$. If a family of four – two parents and two kids use an iPad, the cost of buying an iPad is divided by 4. Although families do not use terms like Cost per User to decide whether to buy an iPad, they definitely calculate it sub-consciously.

Tap a new market segment – Kids are a huge market segment – not just for games, but also in the field of education. Tapping this market segment leads to a huge revenue for Apple.

Use kids to market the iPad and Apps – I was amazed to see how Apple was using kids to market the iPad. With the Share option, kids could share their coloring pages with their friends (the parents might share it for them). Other kids looking at these colorful pages would want to do the same. Not only is Social Media being introduced at a very young age, the iPad is being marketed via Word of Mouth (the most powerful way to influence prospective buyers).

Save money for families and schools – Families and schools can save money on paper, crayons, and other consumables required on a daily basis.

A safer option – Kids (at home or in Pre-K) eat crayons that may be harmful for their health. Since the crayons on an iPad are electronic, it is very safe for kids.

Save the environment – Reducing the usage of paper obviously save trees.

Crayola Paint and Create gave me great insights to Apple’s strategy. I could also envision the future – where most of the interaction happens through touch screens instead of keyboards. It also helped me realize that language will never be a barrier for user interaction since expressive icons are a great way to communicate with the user. Intelligence, knowledge, skills, language, and education will never be a barrier for users in the world of touch screens.

Hello kids, welcome to the iWorld!

Turn your home wiring into a computer network!

I was watching Netflix the other day when it started buffering frequently. In this day and age, a constant wireless speed should be a given. We have put a man on the moon, but we can’t have constant wireless speed even within the same apartment

I did some research and discovered that many devices interfere with wireless signal. Wireless signal – by its nature – travels through air, and is subjected to interference from other devices that also create wireless signals. The list includes cordless phones (the main culprit), microwave ovens, computers, Bluetooth devices, television sets, speakers, air purifiers, home wiring, fans, and numerous devices we use at home on a day-to-day basis.

If only I could wire my entire apartment with Ethernet. It’s an expensive proposition – but is it worth it? Are there any alternatives?

Yes. I found a very cool solution to turn my home wiring into a computer network. The home wiring can carry data like the Ethernet and provide faster speeds than wireless. I installed a D-Link PowerLine AV 500 4-Port Gigabit Switch Kit. The configuration was extremely simple:

  • Step 1 – Transmitter: I plugged in the white device to a power plug near my cable modem/wireless router. I plugged in an Ethernet cable from this device to the cable modem /wireless router.
  • Step 2 – Receiver: I plugged in the black device to a power plug near my TV/Blu-ray. I plugged in an Ethernet cable from this device to the Blu-ray.

And voila! My Blu-ray was connected over Ethernet! I could now get a veryhigh Internet speed at my Blu-ray. Netflix never buffered again.It is amazing that my home wiring can actually be used as an Ethernet network. I am sure this is useful for people in large homes. Imagine working on a weak wireless signal on the second floor room when your router is in the basement. The Powerline Ethernet adapter will solve the problem. You could buy multiple receivers and plug them throughout your home. You can also build a nice network to share Internet data, music, movies, and files across multiple users in your home. This device is extremely useful for gaming systems as well.

If you build a home network, be sure to use advanced threat protection. You wouldn’t want unauthorized programs taking control of your home network!