Welcome to the world of ‘Touchless’ Smartphones!

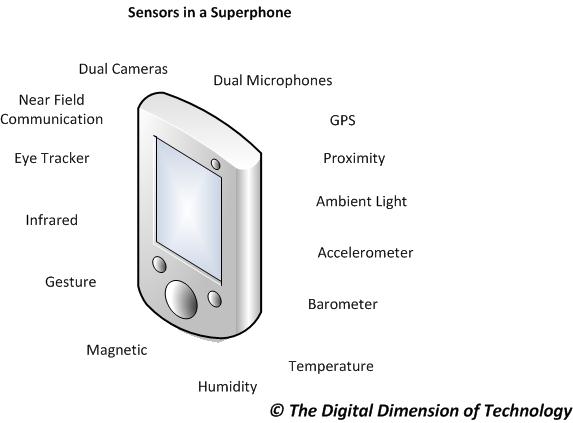
Imagine interacting with your smartphone without even touching it. Imagine waving your hand or pointing your finger to perform tasks on your smartphone. Better still, imagine interacting with you smartphone using your eyes! If only you could change the music by waving your hand or feet or view photos by pointing at your smartphone. Wouldn’t it be cool if you could wave your hand over the smartphone to check the time? Sounds interesting, doesn’t it?

I was wondering if touchscreens on smartphones will eventually become ‘gesture-screens’ and whether all user interaction will be devoid of the ‘Touch’.  Is gesture-based user interaction the future for smartphones and tablets?

Actually, the future is already here! Gesture-based user-interaction was implemented in the Samsung Galaxy. There’s a lot more you can do with gestures than with just touch. You can use your eyes, head, hands, feet or any part of your body to navigate through your smartphone or tablet.

Let’s look at a few cool features of the Samsung Galaxy’s gesture-based user-interaction.

Air View

The Air view feature gives you a ‘Preview’ of the particular UI element by just hovering your finger over it. You must turn Air view on before previewing using gestures. Go to Settings > Motion and Gestures > Air view. Switch Air view On.

Air_View_On

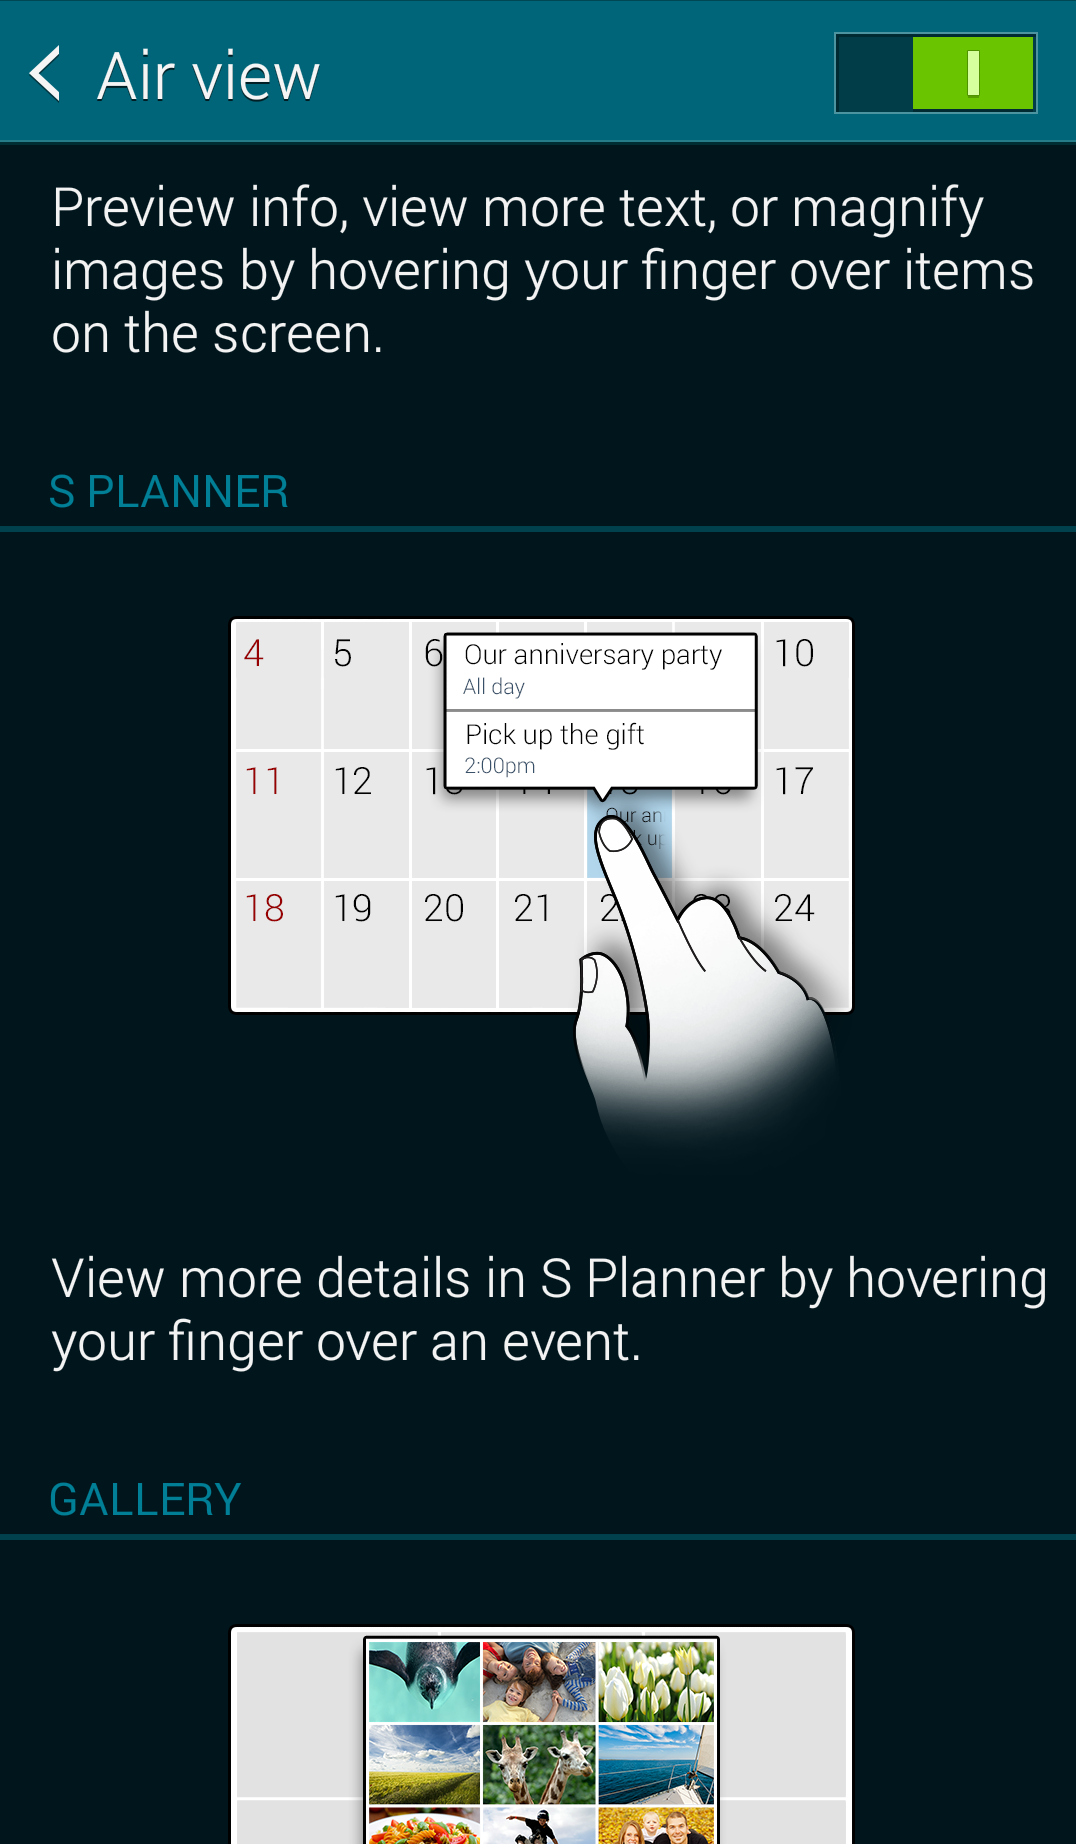
This feature allows you to preview photos, events, speed dial numbers, text messages etc.

Here are a few live examples of how Air view looks like on the Samsung Galaxy:

Previewing photos through Air view:

Air_View_Photo

In the above photo, I am ‘Air viewing’ a particular photo in my album. Instead of navigating through all the photos, I just need to hover my finger on all photos one at a time for a quick preview. This feature is very useful and saves a lot of time in finding the right photo to upload or share.

Previewing text messages through Air view:

Air_View_Text

In the above image, I just hovered on a text message to view the message. I don’t really need to click and view the message. This is a convenient way to navigate through all text messages.

Air browse

Imaging being able to navigate through photos or music by just swiping your palm over the phone without even touching it! Air browse lets you do just that.

You must turn Air browse on before being able to browse using gestures. Go to Settings > Motion and Gestures > Air browse. Switch Air browse On.

Air_Browse_On

This feature lets you change music even when the screen is locked. Just wave your hand on the screen and you can change tracks right away.
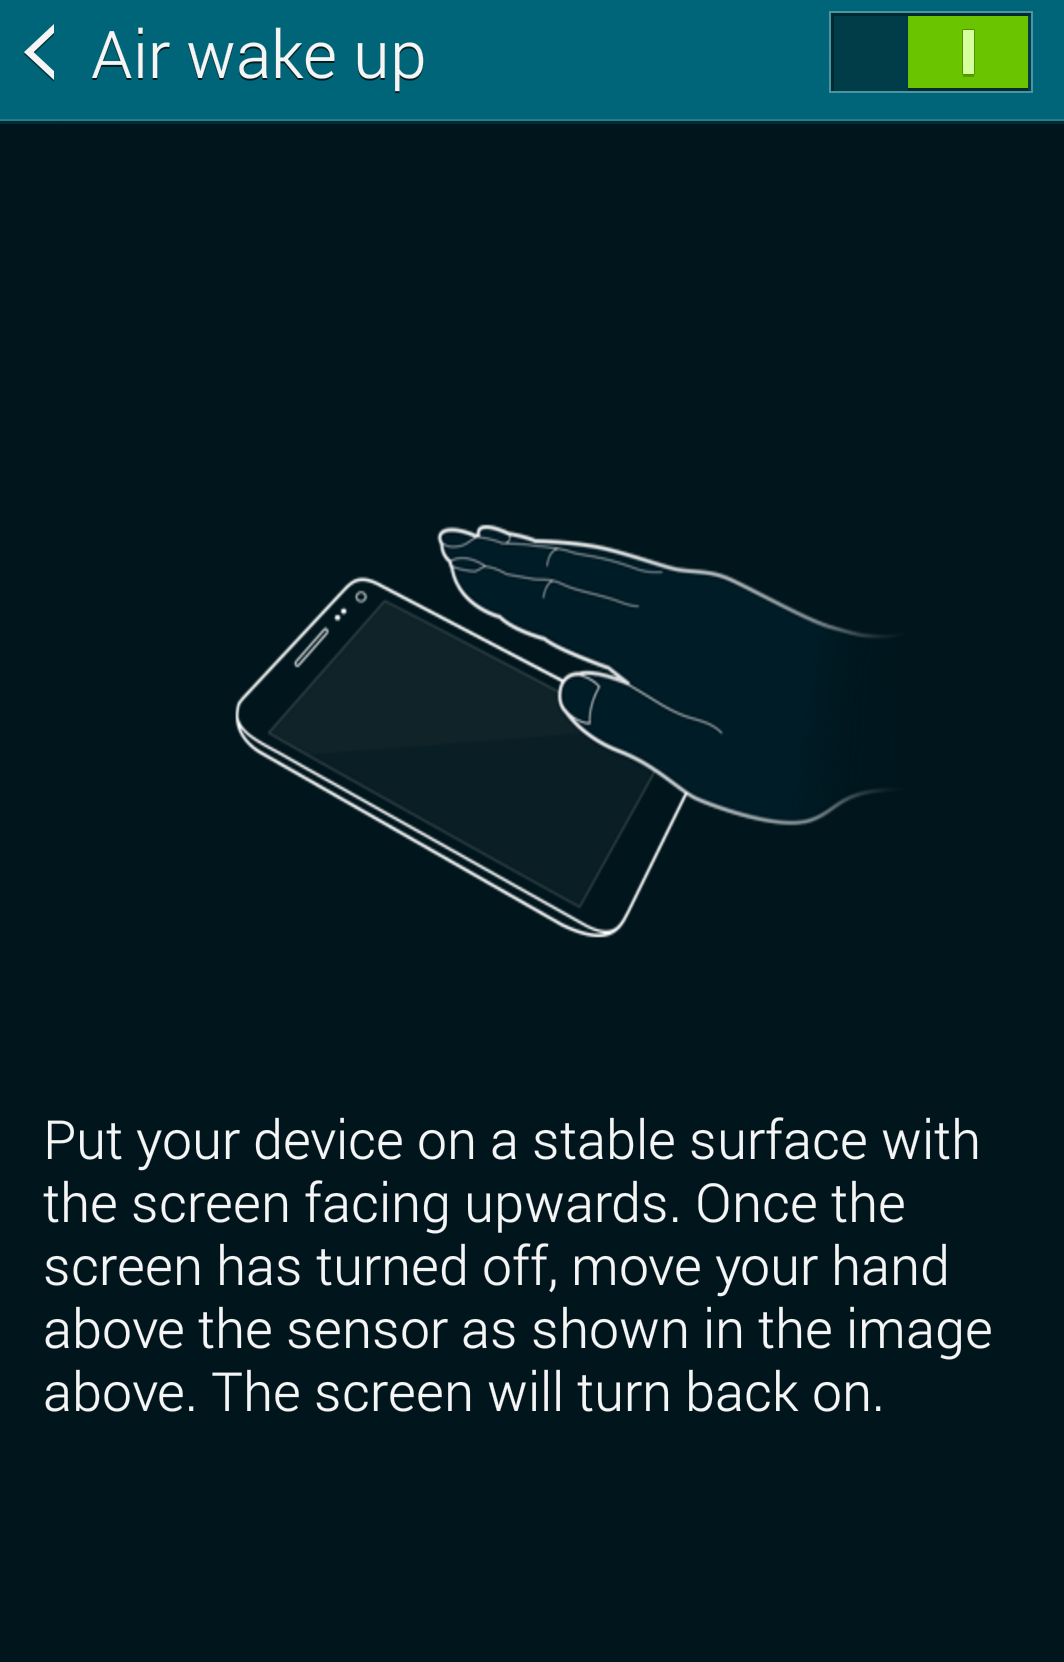
Air wake up

Generally, once a smartphone goes into sleep mode, the only way to wake it up is to click the power or home button (depending on the model of the smartphone). Samsung Galaxy S5 provides an awesome feature where you can hover your palm on the proximity sensor and it automatically wakes up the device.

You must turn Air wake up on before being able to wake up your smartphone using gestures. Go to Settings > Accessibility > Dexterity and interaction > Air wake up. Switch Air wake up On.

Air_Wake_up_on

This feature is useful if your hands are wet or you don’t want to touch the phone at night but you want to quickly check the time. This is also a quick way to check updates within the widgets on your home screen.

Smart Scroll

Imaging being able to scroll through a web page by tilting the device or your head. Smart scroll does just that.

You must turn Smart scroll on before being able to scroll using gestures. Go to Settings > Accessibility > Dexterity and interaction > Smart Scroll. Switch Smart scroll On. You can either choose to navigate by tilting the device or tilting your head.

Smart_Scroll_On

Smart Pause

I’m sure this has happened to you – you look away from the movie you are watching on your smartphone, and you miss the action! If only there was a way to pause the movie on your smartphone every time you looked away. Smart pause lets you do just that.

Samsung Galaxy has a feature where the video pauses automatically when you look away! To enable Smart pause, go to Settings > Motion and Gestures > Mute/Pause. Switch Mute/Pause On. Select the Smart Pause check box.

smart_pause_on

These amazing features make me wonder whether Is it really the end of the ‘Touch’. It’ll be interesting to see how gesture-based user-interaction improves over the coming years. With cut-throat competition amongst smartphone companies, new ways of user-interaction will become unique selling features. It will be interesting to see who wins in the end. At the moment, I see only one winner – and it is you, the user. Because you can now use your smartphone without touching it!

Disclaimer: The Digital Dimension of Technology is an independent non-commercial technology blog. We have not been endorsed by Samsung or Google (Android). 

Mobile Payments: Leave your wallet at home!

How many times have you rushed to work only to realize that you have forgotten your wallet at home? Well, the only option then is to borrow money from your co-workers (for lunch or the odd coffee) and this can be quite embarrassing! And now think about the one thing you never leave home without these days? You guessed it right – your mobile device. People are glued to their smartphones throughout the day and sometimes, even in bed.

The mobile world presents a great opportunity for any seller to accept payments using your mobile phone. If your mobile phone was also your wallet, you would never have to carry your “real” wallet.

Just out of a curiosity to see how such a concept would work, I decided to install a mobile payment app on my Android phone.

Setting up Mobile Payments

Before paying using my smartphone, I had to enable NFC, download the mobile payment app, register my credit card, and configure the app itself.

Following are the step-by-step procedures:

1. Enable NFC: First, I enabled the Near Field Communication (NFC) feature on my Android phone. NFC allows smartphones to communicate with other devices in the vicinity. The communication is encrypted. Smartphones that do not have NFC cannot be used for mobile payments (for example, the iPhone). As soon I enabled NFC, a N sign appeared on the top of the screen.

NFC

2. Download the Mobile Payments App: I downloaded the CIBC mobile payments app. You can download the mobile payments app for your credit card/bank.
3. Call the bank to activate: There was a manual process involved with CIBC. I had to make a phone call to CIBC to activate mobile payments for my credit card.
4. Receive notification from CIBC Mobile Payments: Once I received the notification, I knew the activation was successful.
5. Set a password: This step is optional. For security reasons, it is better to set a password – just in case your mobile phone is lost or stolen.

Passcode

The configuration was complete and the app said ‘Congratulations!‘.

Config_Done

Making a Mobile Payment 

Once the setup was complete, I tried to figure out how I could make a payment. Surprisingly, making a payment was extremely simple.

1. Launch the Mobile Payment app (CIBC) on your smartphone. Enter your password if you have set one.

Launch_app

2. Tap the credit card to activate Pay Mode for 30 seconds.

Pay_Mode

3. Tap your phone on the payment terminal. You can also move your smartphone within 10 centimeters of the payment terminal. The payment is processed.

Security Features in Mobile Payments

The mobile payments app has many security features:

  • Call the bank to add your credit card. This ensures someone else is not activating your card.
  • Password on the mobile payments app. This is in addition to the password on your phone.
  • Pay Mode deactivated in 30 seconds. This ensures that your credit card information is not read from your phone when you don’t want it to be read. You are always in control.
  • Communication between the smartphone and the terminal is always encrypted.

Advantages of Mobile Payments

  • You don’t need to carry your wallet.
  • Reduce credit card theft. Since you are not swiping your credit card anywhere, it cannot be read by hackers.
  • Any terminal that accepts VISA payWave® or MasterCard PayPass™ will also support NFC transactions.

Disadvantages of Mobile Payments

  • There aren’t many touch-to-pay terminals at the moment.
  • Not all credit card companies offer mobile payments.
  • Not all mobile carriers offer mobile payments.
  • You need a separate SIM card to enable mobile payments (provided by the carrier).
  • If smartphones are lost or stolen, the credit card details can be extracted by a smart hacker.

The smartphone industry is growing at an alarming pace. Up until yesterday, your smartphone was your computer, camera, and maybe even your bathroom mirror. Today, smartphones are credit cards and mobile payment terminals. You can now forget your wallet at home and you don’t need to borrow lunch money from your co-workers!

Disclaimer: The Digital Dimension of Technology is an independent technology blog. We have not been endorsed by Rogers, Samsung, CIBC, or Google (Android). We do not endorse the security, usability, and reliability of mobile payments. 


Octa-core Superphones: When a Single Core is just not enough!

I was surprised to hear that the Samsung Galaxy phones will have an Octacore processor (a processor with 8 cores). A smartphone is essentially a computer – like our home computer. What do we really do on a home computer? We surf the Internet, create documents, and play movies. Among other components, a computer contains a Central Processing Unit (CPU) to perform all these tasks. Traditionally, older CPUs had a single core.

What is a ‘Core’, really? As a non-technical end-user, why do I really care as to how many cores the CPU in my smartphone has? Before answering these questions, let us talk about something else:

How does a motor vehicle with an internal combustion engine work?

Scooters have an internal combustion engine with a single cylinder, piston, and a spark plug.  When fuel is injected into the cylinder, the spark plug creates a spark and the explosion pushes the piston. Consequently, the scooter moves forward. With a single cylinder comes a limited amount of power. In comparison, the engine of a car has four cylinders. Four cylinders give more power than a single cylinder. More interestingly, the work is equally divided amongst the four cylinders. As a result, one cylinder is not overloaded and one cylinder never overheats.

Let’s compare the processor with an engine and the core with a cylinder.

The biggest challenge chip designers face today is the inefficiency of a CPU in terms of heat emission. Like single cylinder engines, CPUs with a single core produce a lot of heat which makes them inefficient in terms of power consumption. To solve this problem, chip designers created a multi-core processor (like the multi-cylinder engine). The processing is divided between multiple cores thereby reducing heat emissions and consequently reducing power consumption. It is common to see dual-core or even quad-core processors in computers today.

cpu

So far, phones usually had a CPU with a single core. With the launch of Samsung Galaxy, we are entering a new era of smartphone computing. The Samsung Galaxy S6 has an Octa-core processor (8 cores). Why does a smartphone need so much power? When a home computer can do everything with a slower processor (and single core), why does a smartphone need a faster processor (with 8 cores)?

The Samsung Galaxy has the following components that a home computer or even a basic business computer does not have:

Smartphone_Sensors-1

  • GPS tracks your location.
  • Proximity Sensor turns the screen off when you hold it to your face.
  • Ambient Light Sensor automatically adjusts brightness.
  • Accelerometer senses movement and orientation.
  • Barometer measures pressure.
  • Temperature Sensor measures the temperature.
  • Humidity Sensor measures the humidity.
  • Magnetic Sensor measures the magnetic field.
  • Gesture Sensor senses your hands to navigate.
  • Infrared Sensor turns the phone into a remote control.
  • Eye Tracker pauses video when you look away.
  • NFC (Near Field Communication) shares data by touching two phones and also enables mobile payments.
  • Dual Cameras are available; one on the front and one on the back of the phone. Both cameras can record simultaneously in the Samsung Galaxy S6.
  • Dual Microphones are used in the phone; one microphone for voice and the other to listen to the ambient noise and create anti-noise using the noise-cancelling system.

These sensors constantly gather large amounts of data and need constant processing. A CPU must have multiple cores to compute all this data simultaneously. The CPU assigns tasks to different cores, keeping a single core from overheating. Less heat is generated and hence, less power is consumed.

With battery technology not evolving as fast as CPUs, manufacturers don’t have a choice but to make CPUs that are  more efficient in terms of power consumption and heat emission. Unless better batteries are developed, smartphone manufactures will strive to use better processors with each new model to remain competitive. (You might want to read more about my idea on battery technology in my earlier post Is the Smartphone Industry Curious about Curiosity?.)

Next time you use your smartphone, you might want to count the number of sensors it has. It would be really interesting to see how many of us are able to identify all the sensors on our smartphones!

When Earthlings become Martians

Did you ever wonder about traveling to another planet? Were you glued to sci-fi books and movies as a kid? If yes, read on. There’s a huge project underway to build a Human Colony on Mars. And interestingly, you can now be a part of it thanks to Mars One.

About the Mars One project

Mars One is the company that will give you an opportunity to live on Mars. The Mars One project involves sending four people to Mars every two years. Now, these are not astronauts or space-pilots, but regular people like you and me.  This is a great opportunity for people who want to be a part of a new era. Bas Lansdorp launched Mars One in 2012. He has an impressive team, well-known advisers and strong suppliers. Here is a cool promotional video.

The journey from Earth to Mars will take 7 months. The travel through space will be a great experience where you can view the stars, planets and asteroids with naked eyes. And finally, walking on Mars, an even better experience!

Mars_Landscape1
Mars Landscape. Photo by Mars Rover Curiosity: Courtesy NASA/JPL-Caltech 

The catch? It is a one-way ticket. You go to Mars, never to return.

Mountain_Top_Created_in_Crater_MRO
Top of a mountain that was created inside a crater due to impact. Photo by Mars Reconnaissance Orbiter. Courtesy NASA/JPL/University of Arizona

Here’s the roadmap for the Mars One project:

2013 – Accepting applications for going to Mars.
2014 – Building the first communication satellite.
2015 – Astronaut selection process will be completed.
2016 – A supply mission that will carry 2,500 kilograms of supplies to Mars.
2018 – A space exploration vehicle will be sent to Mars to pick a location for settlement.
2021 – Six capsules and another Rover will be sent to Mars. This will include two living units, two life-support units and two supply units.
2023 – History will be created! The first colonists will arrive on Mars.
2025 – A second group will be sent.
2033 – The number of colonists will reach 20.

The coolest feature of the Mars One project is that everything will be done using currently available technology. This means, no traveling at the Speed of Light like you read in science-fiction books. The Mars One project will only use technology of today that is reliable and tested.

Bacolor_Crater_Mars_Odyssey
Bacolor Crater. Photo by Mars Odyssey: Courtesy NASA/JPL-Caltech 

Why do we need to explore other planets?

Hundreds of explorers weathered deadly storms to discover new continents. Consider the Mars One project to be another exploration – but this time, in the solar system rather than on Earth. We could discover new ways to live and learn so much about living outside Earth.

Mars_Sand_Dune_MRO
Sand dune on Mars. Photo by Mars Global Surveyor Orbiter: Courtesy NASA/JPL-Caltech 

Aren’t there other planets that can support life better than Mars?

Astronomers have been trying their best to find a Goldilocks planet where life can be sustained. A Goldilocks planet is a planet that is neither too far or too near to its Sun. If it was too far from the Sun, it would be too cold and being too near would make it too hot to sustain water and any other life on its surface. Most of the planets we have found are so far away, that it is impossible to go there with the current technology. Take  Gliese 581 d for example, which is a Goldilocks planet that was discovered recently. Gliese 581 d is 20 light-years from Earth. This means it would take us 20 years to reach there if we were able to travel at the speed of light! Since traveling at the speed of light is not going to happen anytime soon, I don’t think Gliese 581 d is an option for now.

Evidence_of_Water_Stream
Evidence of water flow. Photo by Mars Rover Curiosity: Courtesy NASA/JPL-Caltech 

Why Mars?

This, by far, is the most important question and has many interesting answers:

  • Water – Mars has underground ice deposits and frozen polar ice caps that show an abundance of water. If we were to melt the polar ice caps on Mars, there would be enough water to cover the entire planet upto a depth of 11 meters. Now, that’s a lot of water! Water is the most important medium for life to grow. If not for water, we would not exist today.
  • Gravity – The gravitational force on Mars is 38% that on Earth. Unlike the Moon that has 1/6th of Earth’s surface gravity, Mars has enough gravity to hold down atmosphere, which is essential for life. The atmosphere also protects from solar radiation.
  • Temperature – The high temperature on equatorial Mars is around 35 degree centigrade. This is very comfortable and very Earth-like.
  • Mars Day = Earth day – Mars takes 24.622 hours to rotate on its own axis. This means that the day-night cycles on Mars are same as that on the Earth. It would be very easy for Earthlings to adapt to a Mars day.
  • Seasons – Mars has the same seasons as that on Earth. Although, the seasons on Mars are twice as longer since Mars takes 1 Earth year and 320 Earth days (685 Earth days or 1.8 Earth years) to orbit the sun.
  • Soil – The soil on Mars is conducive for the growth of plants. The soil contains Magnesium, Sodium, and Potassium that are useful for plants.
  • Atmosphere – Mars has a sparse and hospitable atmosphere. 95% of the atmosphere in Mars is CO2. Plants need CO2 to breathe and we could take seeds or plants to Mars where they could grow.

Mars_Water_in_the_form_of_ice
Ice found in a fresh crater. Photo by Mars Reconnaissance Orbiter: Courtesy NASA/JPL-Caltech

Ice_on_Sand_Dune_North_Pole_HiRise
Frosted ice on sand dunes (north pole). Photo by Mars Reconnaissance Orbiter:
Courtesy NASA/JPL/University of Arizona

What are the challenges?

After having talked about the advantages of mars here are a few disadvantages that create huge challenges:

  • Gravity – Since Mars has only 38 % of the surface gravity of the Earth, our bodies (especially bones) will get used to the lower gravity. Even if we wanted to return to Earth in the future, our bones would have weakened by adapting to the lower gravity on Mars. Our bones would be strong enough for Mars, but returning to Earth will just crush them due to the higher gravity. Although there has been enough research and treatment is available for astronauts living in zero gravity, our bones would develop a condition called osteoporosis (bones become porous). That’s why the colonists can never return to Earth even if they wanted to.
  • Atmosphere – With 95% carbon-di-oxide in its sparse atmosphere there would be no option but to wear spacesuits. We can build greenhouses to grow plants that would convert CO2 to O2, but this is really challenging. After all, we would need a good stock of oxygen to tide us over until we are able to generate oxygen on Mars.
  • Medical Services – We are on our own if we fall seriously ill. Mars One does plan for basic treatments. However, it would not be possible to provide the advanced treatment available on Earth today (for example a complicated surgery).
  • Natural Calamities – Since Mars is unchartered territory, Mars quakes (Earthquakes, but on Mars!), or dust storms might damage the settlements. We are in no way ready for this such natural calamities.

Mars_Dust_Storm4
Dust storm on Mars. Photo by Mars Reconnaissance Orbiter: Courtesy NASA/JPL-Caltech

Avalanche_Clouds_HiRise
Avalanche clouds. Photo by Mars Reconnaissance Orbiter: Courtesy NASA/JPL/University of Arizona

How would the settlement communicate with their families on Earth?

Mars One will provide Internet access. That said, communication with Earth is particularly challenging. Mars is at a distance of 55 million kilometers (shortest) and 400 million kilometers (farthest) from the Earth depending on the orbital location.

The_Earth_and_the_Moon_photographed_from_Mars_orbit
The Earth and her Moon. Photo by Mars Reconnaissance Orbiter: Courtesy NASA/JPL/University of Arizona

Therefore, it would take the signal anywhere between 3 to 20 minutes to reach the Earth. You could send e-mails or use video messages, but you’d have to wait 3 to 20 minutes for your message to reach there and an equal amount of time before you hear back. There goes your Skype party.

Mars5_Sharp_Mountain_5
Panorama of Mount Sharp taken by Mars Rover Curiosity: Courtesy NASA/JPL-Caltech (click image to enlarge)

How would Mars One fund the project?

The entire project from launch to settlement would be broadcasted to generate subscription and advertising revenue. As a business model, this is quite challenging. There must be a steady stream of revenue forever so we can constantly send supplies to our colony on Mars. Shutting down the company after sending humans to Mars is not an option. This, in my opinion is the most challenging because as a business, failure is not an option! 

Ripples_in_Proctor_Crater
Ripples in the sand at the Proctor Crater. Photo by Mars Global Surveyor Orbiter: Courtesy NASA/JPL-Caltech 

How can I help?

There are many ways you can help this amazing project:

Sunset_on_Mars_Mars_Exploration_Rover
Sunset on Mars. Photo by Mars Exploration Rover: Courtesy NASA/JPL-Caltech

Finally…

Mars has the potential to be our new home. If the Mars One project is successful, there is no limit to the extent of space colonization. Thousands of people could migrate to Mars and live a great life there.

And you could be one of them.

Mars_First_Daybreak_Gale_Crater
Daybreak on Mars (at the Gale Crater). Photo by Mars Global Surveyor Orbiter: Courtesy NASA/JPL-Caltech 

Disclaimer: The Digital Dimension of Technology is an independent non-commercial technology blog. We have not been endorsed by Mars One. 

Image Courtesy: NASA/JPL-Caltech (JPL Image Policy) and  NASA/JPL/University of Arizona (HiRISE Image Usage Policy).


Is Your Printer ‘Cloud Ready’?

As the world goes mobile with smartphones and tablets, there’s still one thing that has not changed much in the recent times – the printer.

Setting up a printer to work with multiple devices usually involves installing multiple drivers on the devices. You may need to print from any one, or a combination of the following devices:

  • Windows computer
  • Mac computer
  • Linux computer
  • iOS devices
  • Android devices
  • Windows mobile devices
  • Blackberry devices

And when dealing with these devices, not only do you need different printer drivers for different operating systems, you also need to keep updating the drivers to the latest version.

When managing the apps or drivers for the your devices, you may face the following problems:

  • Drivers not updated on the device
  • Drivers not supported (for example, for Windows XP)
  • Drivers not available (for example, for Linux devices)

When you want to print an important file, you may run into many problems which can be very frustrating. Not to mention the fact that your computer needs to be physically connected to your printer, or at least to your network. In a ‘Mobile World’, this may not be true anymore.

Thinking about these issues, I thought about the characteristics of my ideal printer:

  • Never needs updates – I don’t want to waste my time updating my drivers.
  • Is OS agnostic – the driver must work on all operating systems.
  • Is device agnostic – the driver must work on all devices.
  • Is printer agnostic – I don’t want to upgrade the driver even when I upgrade the printer.
  • Is network agnostic – the driver must work across networks or even over the Internet.
  • Is secure – the driver must be secure over the network or the Internet.
  • Is self-fixing – the bugs in the driver must be fixed automatically by the printer manufacturer.

I was wondering if there could be a driver that fulfills my stringent criteria. And then, I found my ideal printing solution – Google Cloud PrintGoogle Cloud Print lets me print from multiple devices and even print over the Internet!

GPC_Simple

All you need to make it work is a Cloud Ready Printer, an Internet connection, and a Google (Gmail) account.

How do I connect my printer to Google Cloud Print?

Make sure your printer is ‘Cloud Ready’. Most network or Wi-Fi printers are Cloud Ready these days. For example, the Samsung SCX 3405FW. Here are a few simple steps to connect your printer to Google Cloud Print:

1) Connect the Cloud Ready printer to your router over Wi-Fi or via ethernet.

2) Logon to your printer through a browser. The URL will be something like http://192.168.x.x. Once you enter the user name and password to logon to the printer, you will be presented with a dashboard to configure the printer settings. (Check the printer’s user guide for its user name and password.)

3) Go to the Google Cloud Print option. (Check the printer’s user guide for the exact location of the Google Cloud Print setting.)

4) Enter your Google (Gmail) user name and password. This step authorizes your printer to receive print jobs from Google Cloud Print.

5) After configuring your printer to receive print jobs from Google Cloud Print, your Google email will be displayed as the registered email.

GCP_Printer_Dashboard

How do I print a document using Google Cloud Print?

Once your computer is connected to Google Cloud Print, download the Cloud Print app on your mobile device. You can then print any file from any device over the Internet or local network. Here are a few steps to print any file on an Android device:

1) Open Cloud Print. Click Local > Files to access files available locally on your phone.

Cloud_Print1

2) Select any file and confirm the print action.

Cloud_Print2

3) Modify the Page Setup and print the file.

Cloud_Print3

The file is immediately printed over the Internet!

If you have multiple devices, with multiple operating systems, you need not worry anymore. Google Cloud Print automatically manages the drivers for all devices. All you need is a Cloud Ready printer connected to the Internet.

With Google Cloud Print, you never have to update the printer drivers. Even if you change your printer, you never have to reinstall the drivers. The only thing you need to do is ‘authorize’ your printer to accept print jobs from Google Cloud Print.

Is Cloud Printing useful for business?

Google Cloud Print could be a game changer for IT departments in small business. With Google Cloud Print, small businesses could avoid having a computer at various warehouse locations and just schedule a print job over the cloud.

Consider a hypothetical small business selling cosmetics to a small customer base across a distributed geographic location:

gcp-1
  • The mobile sales teams in various shopping malls (or the branch office) accept orders and send the print jobs to the cloud ready warehouse printers.
  • The warehouse employee creates a package and pastes the shipping label on the package.
  • Since warehouses do not have computers, there is no computer maintenance required.
  • Google Cloud Print not only saves money for small businesses, but also reduces the hassle of managing computers in multiple locations.

It’s really cool isn’t it? It’s time you upgraded to a printer that supports Google Cloud Print. Because, printer drivers could soon become extinct. It would be interesting to see how Google Cloud Print evolves in future. I would’t be surprised if Google adds multiple features like Cloud Scan or Cloud Fax considering the fact that most Cloud Ready Printers are Multi-function printers (printer, scanner, fax, and copier). 

The next time you want to print an important document, don’t wait till you get home. You could print remotely when you are on your way home in your car or on the train. Better still, you could print from halfway across the world, and your printer will still finish the job right away like a humble minion.

Managing Mobile Devices at Home

I am sure most of us have multiple mobile devices at home, such as smartphone, a tablet, or the distant cousin of the smartphone and tablet – the phablet. These mobile devices may be a combination of iOS, Android, and Windows Mobile.

With our kids, spouse, and parents using mobile devices, it becomes imperative for us to manage all these devices from a single interface. Especially with less technical users, it is important to manage tracking, apps, and other settings on the devices for them.

The Questions

When managing these mobile devices at home, there are some questions that plague us quite a bit, such as how do I:

  • Track my devices: Where are the devices right now? Where have the devices been?
  • Monitor my devices’ data: How do I monitor call history, Wi-Fi networks that the device has connected to, and Apps installed on the device?
  • Manage apps on my devices: How do I install an app on all my devices remotely? Can I delete Apps from my devices remotely?
  • Protect my devices: How do I enforce a Password Policy, remotely lock, or remotely wipe the device?

The Problem

Unlike corporate IT departments, we don’t really have a budget for advanced Mobile Device Management (MDM) solutions. So, in effect, here’s my problem:

  • I want to manage my mobile devices at home (for my family).
  • I have no money to buy an MDM solution for my home.
  • I don’t really have the training required to use an MDM solution.

The Solution

The answer to my problem is the Mobile Device Management solution by a company called 3CX. This MDM solution is cloud-based and so there is no installation required except on the mobile devices you want to manage. The 3CX Mobile Device Management solution is easy to use, has a web-based interface, and lets you manage up to 5 devices for free.

Setting up the MDM

Here’s how I set up the MDM solution on my devices:

  1. Go to http://www.mobiledevicemanager.com/ and sign-up. To activate the account, click the link in your email.
  2. Download and install the 3CX MDM App on the Android and iOS devices. When prompted, I logged in using using the credentials I created in step 1.
  3. Go to http://www.mobiledevicemanager.com/ from any browser and log in. Go to the Pending Approval node and approve the devices.

(For more information, refer to the 3CX getting started guide. It’s concise and well written.)

And Voila! The devices are visible on the web-based dashboard.

1Dashboard

The interface is clean and easy to navigate. I’ll talk about a few cool features of the MDM solution. I’ve added some screenshots of the MDM solution. You can click the images for a larger view.

Managing Mobile Devices

The Devices node lets you manage all your devices from a single interface. As you can see, both my devices are listed. One interesting feature is that the node shows you the last time when your device checked-in.2a_Device_List

Click the device you want to manage. For this example, I clicked the Android device. A few critical icons appeared as soon as I clicked the device. I’ll talk about a few important ones:

0_Device_List_Icons

  • Messaging – you can send a message to the device directly from this interface.
  • Lock – you can lock the device remotely.
  • Unlock – you can unlock the device remotely. You can also set a passcode.
  • Wipe – if the device was stolen, you can wipe the data on the device remotely.

The following tabs show a lot of useful information.

Map tab – displays the current location of the device.

2b_Map

The Info tab shows useful information about the device. I found it interesting that it was able to tell me if the device was charging or on battery. Interestingly, it displayed the memory and CPU usage too!

2c_Info

The Applications tab shows the list of applications installed on the device.

2d_Applications

The Location History tab shows all the locations where the device traveled to in a certain time frame. The grid shows a time stamp, address, and location co-ordinates. The location is accurate to a few meters. 2e_Location_History

The Call History tab shows a list of all outgoing and incoming calls with the duration.

2f_Call_History

The Policy tab lets you manage the usage policy. You can also enforce a password policy, if necessary.2g_Policy

The Wi-Fi tab shows all the Wi-Fi networks the devices connected to in a certain time frame. Interestingly, it also displays the security type and the visibility of the Wi-Fi networks that the device connected to during those times!

2h_WIFI

The Email tab lets you configure an email account on the device remotely.

Email_Tab

Navigation

The MDM has a Tree pane and an expandable node for easy navigation. You can expand nodes that have one or more sub-nodes.

3Nodes

Depending upon the node, the following information is available:

  • Dashboard –  a snapshot of the managed devices.
  • Devices – list of managed devices and detailed information shown through various tabs as described in the previous section.
  • Pending Approval – lets you approve the devices before managing them.
  • Group Policies – lets you define the behavior of certain settings. For example, your Password Policy.
  • Messages – lets you send messages to online devices.
  • Users – lets you add, modify, or delete users.
  • Alerts – lets you configure alerts for various actions performed by the device or the user.
  • App Management – lets you manage the Apps on the devices. (I will explain App Management further in this post).
  • System – settings for the Administrator.
  • Resources – help files and other useful links.

Alerts

The 3CX MDM lets you configure alerts based on various actions. Here is how the alert configuration screen looks:

4Alerts

App Management

I have saved the best for the last. App Management, in my opinion, is the most important feature of this solution. Expanding the App Management node shows these other sub-nodes:

5a_App_Management

1) Installed Apps – shows the list of apps installed on your managed devices. You can select a particular app and click Remove Application to remove the app from the device.

5b_Installed_Apps

2) App Repository – shows your own App Repository. You can create your own App Repository by adding apps from iTunes or Google Play store. You can use this repository to quickly install apps onto the managed devices. For example, if you are going to Disney world, you can add the Disney app to the repository. You can then easily deploy this app onto the devices used by your family.

5c_App_Repository

Once you have an app to the App Repository, go to Devices > [Your Device Name] > Applications (tab) > Add from Repository (button) and select the app from the dialog that opens. Select the App you want to deploy to the device and click Add.

Add_From_Repository

3) Whitelisted Apps – users of your mobile devices are allowed to download these apps. For example, I added the weather app as a Whitelisted App. The users of my managed mobile devices can now install the weather app. 5d_Whitelisted_Apps

4) Blacklisted Apps –  users of your mobile devices are not allowed to download these apps. For example, I added a poker app as a Blacklisted App.

5e_Blacklisted_Apps

Conclusion

Homes and people are now connected via mobile devices. With more and more devices entering our homes, the safety, security, and management of our mobile devices become a critical task. Consequently, Mobile Device Management solutions are not meant for corporates alone. Homes need MDM solutions too. Needless to add, you are now the IT administrator of your connected home.

Disclaimer: The Digital Dimension of Technology is an independent non-commercial technology blog. We have not been endorsed by 3CX. 

Going beyond the device: Expanding the horizons of Super Zoom

Have you ever pushed your device to the limit? Have you ever made your device do what it was not meant to do, like over-clocking your CPU or Jail-breaking your iPhone? I just did something like that. Only it’s something much safer than over-clocking or jail breaking. And I did it to my camera.

I have been using a Super Zoom camera for a while now. A super zoom camera comes with a lens that can go from a Wide Angle to Super Zoom. The Canon SX 40 HS is a good example as it can go from 24mm (wide angle) to 840mm (super zoom).

There are some advanced features that are not available in a Super Zoom. One of the most important missing features is a Remote Shutter Release option. Some DSLRs come with a Wireless Shutter Release option where you can mount your camera on a tripod and take the picture without touching the camera.

Many a time I’ve really really needed a Remote Shutter Release option. For example, when I take photos of the Moon/Super Moon or when I take artsy pictures at night. My super moon picture:

Downtown Vancouver at night:

[For more photos, visit my Photo Blog]

In such cases, I have either zoomed in quite a bit, or am taking the picture in low light conditions. The slightest shake translates into a very bad picture. To avoid shaking the camera in such cases, I usually activate the 10 second timer. But there is some residual oscillation (shake) which sometimes messes up the photos. Reading the camera’s user guide told me that that there was no inbuilt no Remote Shutter Release option available. I also visited many specialty camera in the hope of finding an external device that could act as a remote shutter release. To my utter disappointment, I could not find such a device.

Then, one fine day, I discovered CHDK – Canon Hack Development Kit. This is an open source community that creates programs for Canon cameras to add capabilities in addition to the existing features, for example, a Remote Shutter Release option. So, I decided to build my own Remote Shutter Release kit. Here’s what I did:

(A) Installed CHDK on my camera (the easy part)

To install CHDK:

  1. Go to the http://chdk.wikia.com/wiki/CHDK
  2. Check the firmware version on your camera.
  3. Download the correct build based on the firmware version. Unzip it on your computer.
  4. Copy the CHDK files on the SD card.
  5. Insert the SD card in the camera and press the Review button.
  6. Go to  Menu and update the firmware.

The program is loaded into the memory temporarily. When you shut off the camera, it is removed from the memory. The program does not interfere with the manufacturer’s original firmware. CHDK also provides a detailed user guide.

(B) Created a physical Remote Shutter Release device (the most difficult part)

I searched the Internet and discovered that I have to build a remote shutter release device on my own. I found a great video of a camera user who had built a shutter release device from scratch. I could not follow the same path since I am not as tech savvy. Imagine the trouble if I were to solder a diode onto a circuit!. Moreover, being a technical writer by profession, I believe in simplicity. I wanted a solution that was simple, easy to implement, easy to use, and of professional quality. I could not build a remote shutter release device, and nobody sold one for my camera. It seemed like a dead end.

Numerous searches on the Internet provided no answers. However, I discovered a few things that helped me create a solution for myself:

  • Send > 4V on the data port of the camera to release the shutter.
  • A very high voltage (> 8V) might damage the camera!

I performed some trial-and-error experiments and discovered a very simple solution for the problem. I used the following readymade components:

  • Duracell USB Battery Backup: I used the Duracell USB Battery Backup to experiment with the Remote Shutter Release feature of CHDK. The Duracell USB Battery Backup is rechargeable, has an ON/OFF switch, and is slightly bigger than a matchbox. It has a USB (output) port for charging external devices and a mini-USB (input) port for charging the backup battery.

  • Mini-USB cable: I used a mini-USB cable for the solution. You can easily use the data cable that came with the camera.

(C) Made the hardware and software work together

To make the hardware and CHDK software work together:

  1. Install CHDK on the SD card and update the Firmware [as explained in (A) above]. Once CHDK is in the memory, go to the CHDK menu and enable Remote Shutter. (Print button + Menu button displays CHDK menu.)
  2. Connect the mini-USB cable to the camera’s data port and the other end to the USB port on the Duracell USB Battery Backup.
  3. Switch ON the Duracell USB Battery Backup and Switch OFF immediately. The camera focuses.
  4. Switch ON the Duracell USB Battery Backup and Switch OFF immediately again. The camera releases the shutter!

And I am sure this solution will not damage the camera. Here’s the simple reason why: The camera is designed to use a mini-USB cable that is connected to a computer’s USB port (which has a ~4V output). The Duracell USB Battery Backup also has the same output since it is basically a USB port without the data transmission capabilities.

I was amazed that another device could work as a remote shutter release for a camera that was not built to use one! Amazon, eBay, camera stores, and photography forums did give me ideas for creating this seemingly simple solution. So I thought I must share this discovery with all the other Super Zoom users out there that are also looking for something similar.

Happy Super Zooming!

More information about the Duracell USB Battery Backup: http://www.duracell.com/en-US/product/instant-usb-charger.jspx

Update: May 12, 2012: If you want to use a clicker-like device, the iGo Anywhere USB Micro/Mini Charger would be ideal. Instead of a switch, you could use the button to release the shutter. For more information about iGo Anywhere USB Micro/Mini Charger, visit the Source website here. I tested it out and it works perfectly fine.

Secure your digital identity with Two-step Authentication

I am assuming you have already heard about the Heartbleed bug. If not, here’s what it is: most websites use a technology called Open SSL to securely communicate between users and servers. The servers were compromised due to a vulnerability in the Open SSL code. Due to this vulnerability, hackers may have gained access to millions of usernames and passwords. Your login credentials on many websites are most probably compromised. This breach is not the first time hackers have gained access to usernames and passwords. And I’m sure this won’t be the last time.

Usernames and passwords are gatekeepers to your digital identity. When usernames and passwords are compromised, your digital identity is at risk. If your login credentials are misused, it may take years to recover from the damage. Whether it is your personal brand or your business, securing your digital identity is extremely important.

And thus, it brings us to the following important questions:

  • As a user, how can you safeguard your usernames and passwords on frequently used websites?
  • Is there a way to ensure your usernames and passwords are useless to hackers even if websites are hacked and your credentials leaked?
  • How do you add one more level of security and prevent unauthorized access to your email, Facebook, Twitter,  LinkedIn, or any other website that defines your digital identity?

The answer is two-step authentication.

Two-step authentication (also known as two-factor authentication or two-step verification)

What is two-step authentication? The first step when you logon to a website is to enter your username and password on the login page. Some websites have added another layer of authentication. In addition to your username and password, websites send a security code via SMS to your phone or show a code generator. If an unauthorized user tries to use your login credentials from an unknown location or browser, a code is sent to your cell phone. Without this code, it is impossible to logon to the website even if an unauthorized user knows your username and password. Using two-step authentication, you can now ensure your login credentials are useless to any unauthorized user.

To summarize, here’s what you do when using two-step authentication:

  • Step 1: Enter the username and password.
  • Step 2: Enter the code sent to you (via SMS or code generator). Step two is only if you logon from a new browser/location.

Two-step authentication is a very powerful feature. However, in my humble opinion, this feature is hidden to the user and not marketed well.

How to enable two-step authentication?

Let’s see how to enable two-step authentication for frequently used websites. As I mentioned earlier, this feature is hidden deep inside websites. Users need to navigate multiple menus, pages, and workflows to enable two-step authentication. Here are a few examples on how to enable two-step authentication for services like Gmail, Facebook, and LinkedIn.


Gmail

1) Logon to your Gmail.

2) Go to user@gmail.com at the top right corner.

3) Click Account.

4) Click Security.

5) Click Setup.

Screen Shot 2014-04-14 at 1.12.24 PM


6) Click Start setup.

Screen Shot 2014-04-14 at 1.12.41 PM

7) Specify your cell phone number. Click Send code.

Screen Shot 2014-04-14 at 1.13.23 PM

8) Enter the code and click Verify.

Screen Shot 2014-04-14 at 1.13.54 PM


9) Select Trust this computer. (If this is your personal computer, it may be a good idea to select this option.)  Click Next.

Screen Shot 2014-04-14 at 1.14.09 PM

10) Click Confirm to turn on Two-step verification.

Screen Shot 2014-04-14 at 1.15.13 PM


Before these settings are permanent, you must logoff Gmail and logon again. Now, each time you (or an unauthorized user) tries to logon using your username and password from a different browser or location, Gmail sends a code to your cell phone. Without this code, no one can logon to your Gmail account.

This is what you see when you try to logon to Gmail from a new browser:

gmail


Facebook

Facebook has built an amazing code generator as part of the Facebook App on smartphones. Instead of an SMS, you can choose to use the Facebook Code Generator for Two-step authentication. A unique code is generated every 30 seconds right on your smartphone!

1) Logon to Facebook.

2) Go to Settings.

3) Click Security.

4) Click Edit for Login Approvals.

5) Select Require a security code to access my account from unknown browsers. Click Save Changes.


Screen Shot 2014-04-14 at 1.38.05 PM

6) This message is displayed. Click Get Started.


Screen Shot 2014-04-14 at 1.38.13 PM

7) Select the kind of phone you use. Select Android, iPhone or iPod Touch. Click Continue.


Screen Shot 2014-04-14 at 3.26.40 PM

8) Go to the Facebook app on your iPhone or Android phone. Go to Menu > Code Generator and click Activate. A code is shown on your Facebook app. A new code is shown every 30 seconds.


2014-04-14 16.44.29

9) Enter the security code shown on your smartphone into Facebook on the browser. Click Confirm.


Screen Shot 2014-04-14 at 3.29.28 PM

You are now protected by the two-step authentication using the Facebook Code Generator. Each time you access your Facebook account from a different browser, you will be asked to enter a code from the Facebook Code Generator on your smartphone in addition to your username and password.

This is what you see when you try to logon to Facebook from a new browser:

FB_Code


LinkedIn

1) Logon to LinkedIn.

2) Go to Account and Settings (click Review).

3) Click Account.

4) Click Manage security settings.

5) Click Turn On for Two-step verification for sign-in.


Screen Shot 2014-04-14 at 3.34.24 PM

6) Enter your cell phone number. Click Send Code. A code is sent to your cell phone via SMS.

Screen Shot 2014-04-14 at 3.34.44 PM


7) Enter the code and click Verify.


Screen Shot 2014-04-14 at 3.35.14 PM


Two-step authentication is now turned on for LinkedIn. Each time you access your LinkedIn account from a different browser,  a code is sent to your cell phone. You must enter this code in addition to your username and password to logon.

This is what you see when you try to logon to LinkedIn from a new browser:

LinkedInCode

A final word…

Whether it is a keylogger stealing your password from a public access computer, or a hacker hacking into a secure server, your digital identity is always safer with two-step authentication. Even if your usernames and passwords are compromised, two-step authentication keeps your accounts safe using security codes. Even if an unauthorized user gains access to your username, password, and security code, they are useless for using on another browser. If your usernames and passwords are leaked, they are useless without the updated security code from two-step authentication.

Two-step authentication will not protect servers from hackers. Hackers have stolen over 900 Social Insurance Numbers (SIN) from the Canada Revenue Agency systems. Many online services are planning to update their systems to protect against Heartbleed. For example, BlackBerry plans to release a Heartbleed patch for BBMs. As a user, there is not much you can do to protect your information on government systems or enterprise services since they are out of your control.

However, your online accounts are better protected if you are using two-step authentication. Whether it is the Heartbleed bug, a malware, virus, or an unauthorized intrusion, your usernames and passwords are useless to any unauthorized user. Twitter, WordPress, and many  online services now offer two-step authentication.

The security for your digital identity is fragile. So stay safe, stay protected, and secure your digital identity before it’s too late.


[Edited by: Prarthna Sri]

DSLR vs. Super Zoom: A user’s dilemma

When my regular point-and-shoot died, I was faced with a dilemma of whether I should go for a DSLR or a Super Zoom camera. When I was analyzing the differences between a point-and-shoot, Super Zoom, and a DSLR, the following information confused me the most:

  • Point and shoot: 10 Megapixels
  • Super Zoom: 10 Megapixels
  • DSLR: 10 Megapixels

How could three different cameras, with varied features, give the same 10 Megapixel output? (What is a Megapixel, by the way?)

I found it prudent to approach this confusion with some logical reasoning. Obviously, I needed some answers before I could pick a camera. I was looking for simple information, which was hard to find on the Internet. The information available on the Internet had too many technical details (ISO, f –stops, crop factor, depth of field) and jargons (Single-lens reflex, APS-C sensor, micro four thirds). The information available on the Internet is aimed at people who understand the nuances of photography and not end-users. Being an end-user, I wanted to cut through the jargon.

Some of the questions that I needed answered were:

  • What is a DSLR or a Super Zoom camera? (without too many technical details)
  • What are the main characteristics of each camera?
  • How are they different? (without the jargon)
  • Which one will best suit my needs?

(A) How is an image created in a digital camera?

Before going into camera types, let us look at how an image is created in a typical digital camera:

  1. Light: The essence of a photograph – light falls on the object.
  2. Object: The inspiration behind the photograph – the object, which is being photographed, reflects light onto the lens.
  3. Lens: The eye of the camera – light enters the lens.
  4. Shutter: The gatekeeper – the shutter opens for a fraction of a second to let the light in.
  5. Sensor: A Pixel is born! –light falls on the sensor and is converted into pixels. A pixel is 1 unit of the photo captured by the sensor. A photo is made up of many pixels (and hence the term Megapixel which is equal to one million pixels). Cameras had films in the past, which has now been replaced by a sensor.
  6. Processor: A byte born! –pixels are analyzed by the processor and converted to data (bytes).
  7. Storage: The photo is saved – the photo is stored as data on the memory card or internal camera memory.

Now, let us talk about different types of cameras – DSLR and Super Zoom.

(B) What is a DSLR?

A DSLR has the following characteristics:

  1. Shutter – A DSLR has a mechanical shutter. When you press the shutter release button, the shutter opens for a fraction of a second to let the light in. Anything that does not have a mechanical shutter is not a DSLR. The DSLR gives out a loud Clack sound when you press the shutter release button.
  2. Interchangeable Lenses – A DSLR has the feature of interchangeable lenses. You can use a Wide Angle lens (18-55mm) or a Zoom lens (100-300mm) depending upon your requirement. For example, if you want to shoot a large landscape view of a mountain, you could use a Wide Angle lens. If you want to go closer to an object, you could use a Zoom lens.
  3. Larger Sensor – DSLRs typically have larger sensors.

(C) What is a Super Zoom (also known as Bridge or a Hybrid Camera)?

A Super Zoom camera has the following characteristics:

  • Electronic Shutter – Super Zoom cameras do not have a mechanical shutter. The shutter is entirely electronic.
  • Single Lens – Super Zoom cameras have a single lens that can go from 24mm (Wide Angle) to 840mm (Super Zoom – and hence the name). You cannot change the lens.
  • Smaller Sensor – Super Zoom cameras have smaller sensors than a DSLR.

Super Zoom is also called a Bridge camera since a user moves from a point-and-shoot to a Super Zoom and then a DSLR. Since the Super Zoom basically, acts as a ‘bridge’ between the two types of cameras, it is called as Bridge. Also, Super Zooms have excellent lenses (comparable to entry-level DSLRs), but smaller sensor sizes. Since they perform like a point and shoot with some characteristics of a DLSR (good lens), they are also called Hybrid cameras.

(D) What is the difference in quality of photos between DSLR and Super Zoom?

With all the above information, I was still unable to figure out the exact difference between a DSLR and Super Zoom. Assuming the DLSR uses the same lens as a Super Zoom (to compare apples to apples), what does a larger sensor actually mean if both cameras are 10 Megapixels?

Here’s how I understand it – a DSLR has more definition per pixel.

Simply put, when both DSLR and Super Zooms are rated with the same Megapixel count, the DSLR has a larger surface area on the sensor to define the same pixel. Theoretically, if you had to pick out 1 pixel from a photo taken by a DSLR and a Super Zoom, the pixel from the DSLR would have more information about the image.

Let us compare the difference in definition between a DSLR and a Super Zoom to today’s Web and Social Media tools. Let us say I wanted to tell the world the difference between a DSLR and Super Zoom. I could do it in the following ways:

  • Send a Tweet in 140 words.
  • Write a Blog post in 500 or more words.
  • Create an entire Website containing 50 pages with 500 words per page.

I am saying the same thing, but in three different ways. I am getting the same message across, just in different depth. Similarly, a DSLR gives you maximum definition per pixel simply because it is able to capture more information with its larger sensor. A Super Zoom gives slightly less definition for the same image by capturing slightly less information on its smaller sensor.

A DSLR undoubtedly has the best picture quality since it packs more definition per pixel.

(E) Advantages and Disadvantages of a Super Zoom

After a lot of consideration, I finally decided to buy a Super Zoom Camera. Based on my analysis, the Super Zoom had some distinct advantages over DSLRs. The Super Zoom also had quite a few disadvantages when compared to DSLRs.

Advantages of a Super Zoom camera:

  • Compact – easy to carry around. Good for travel.
  • Cheaper – way cheaper than a DSLR.
  • Single lens – you don’t have to buy multiple lenses. You can easily go from 24mm (Wide Angle) to an 840 mm (Super Zoom). Considering the cost of multiple lenses and the inconvenience of carrying an entire bag just for lenses, the DSLR does not make sense.
  • Never lose the moment – since you can quickly go from wide angle to super zoom with the same lens, you need not fumble around for lenses and miss the moment. For example, you can capture portraits, macros, birds, or high-speed boats with equal ease!
  • Great picture quality – good for digital publishing and small-size printing.
  • Easier to maintain – dust particles entering the sensor when you change lenses is one of the greatest drawbacks of a DSLR. Since a Super Zoom has one fixed lens, there is no question of dust entering the sensor.

 Disadvantages of a Super Zoom camera:

  • Smaller sensor – Less definition per pixel. Therefore, you cannot magnify photos like you can in a DSLR. If you plan to print poster-sized photos, a DSLR is the best option.
  • Single lens – A one size-fits all lens can only do so much. Having a portrait and landscape lens helps in a better picture quality, which a Super Zoom can only try to match.
  • Less features – There are some advanced features in a DSLR that are not available in a Super Zoom. For example, a wireless remote shutter release is not available in a Super Zoom.

As far as I am concerned, I am really happy I decided to go with a Super Zoom (a Canon SX 40 HS). Whether you want to buy a DSLR or a Super Zoom really depends on your requirement, taste, budget, and how likely you are to carry the camera around. I hope this information helps you decide whether to go for a DSLR or a Super Zoom.

To see photos taken using my Super Zoom camera, visit my Photo Blog.

Simplicity. Stability. A Technological Marvel!

I was looking for an operating system that is extremely stable, required less processing power, worked on low memory, never crashed, and was very easy to use. Having used Mac OS X, Windows 7, and iOS, my expectations were extremely high. I was thrilled to discover an operating system that was simpler, better, faster, and more stable than the other operating systems I had used.

Around four years ago, I stumbled upon Ubuntu. Ubuntu changed the way I looked at operating systems. Ubuntu combines the power, stability, and security of a Linux operating system with the ease of use of Mac OS X, Windows 7, and iOS.

Ubuntu can easily revolutionize home computing, or even small business computing. Here’s why:

Simplicity

Ubuntu is extremely easy to use. A user, with absolutely no knowledge of computers, can easily start using Ubuntu. For home computing, all you need is a stable system, an excellent browser, and Office programs. Ubuntu provides all that – and more. A few years ago, I was impressed with the Apple App store that made installation very simple. Ubuntu goes farther than iOS in ease of App installation.

Stability

Firstly, Ubuntu worked smoothly on my old laptop with just 128 MB RAM and a 133MHz Celeron processor. Secondly, Ubuntu never crashed and never corrupted the installed programs. Finally, Ubuntu was inert to viruses, malware, spyware, botnets, and ransom-ware. My computer worked perfectly for many years. In fact, this is my third computer running Ubuntu.

Here’s a quick tour of Ubuntu for Netbook.

Ubuntu Desktop:

The ubuntu desktop is very clean to look at. The icons on the left give ready access to various frequently used programs. The top menu bar allows you to access advanced configuration options and various tools.

20120501-225007.jpg

Menu for Communication

The menu allows you to chat or launch an email program. You can use ALT + TAB to navigate between programs (just like Windows).

20120501-225130.jpg

Menu for Connections:

The menu allows you to connect to Wireless or Ethernet with additional connection options.

20120501-223732.jpg

Menu for Exploring the Computer:

The explorer menu helps you navigate the computer or the network right from the Desktop.

20120501-223941.jpg

Open Office: Writer

Open Office is an open source (free) program that is very similar to Microsoft Office. This program is very useful to the home user or small business. Open Office works pretty well and is extremely stable.

20120501-224108.jpg

Dashboard:

The dashboard allows you to navigate to other programs on the computer. Just move the mouse over the Dashboard icon, and additional options appear.

20120501-224418.jpg

Installing Applications:

This feature beats any know operating system – even iOS. Ubuntu displays the programs Most Frequently Used, Installed, and Apps Available for Download. Unlike Windows, you don’t have to open a browser, search the Internet, download and then install the applications. Most available applications are readily displayed and can be installed directly from list!

20120501-224528.jpg

The Cloud: Ubuntu One

Ubuntu is futuristic. Ubuntu provides a cloud to store your files.

20120501-224631.jpg

Ubuntu is an amazing operating system that can help home and small business in the following ways:

– Save money on software licensing
– Use existing hardware instead of upgrading
– Security (a UNIX core is very secure)
– Stability (a very stable operating system)
– Install Free (Open Source) programs like Open Office
– Simplicity and ease of use (easier than Windows or Mac OS X!)
– All drivers available (printer, webcam, and other drivers work fine)

Is it time to abandon Windows and Mac OS X?

(If you want to try Ubuntu without going through the trouble of installing it first, you can do so at the live Ubuntu demo: http://www.ubuntu.com/tour/en/)