Is Your Printer ‘Cloud Ready’?

As the world goes mobile with smartphones and tablets, there’s still one thing that has not changed much in the recent times – the printer.

Setting up a printer to work with multiple devices usually involves installing multiple drivers on the devices. You may need to print from any one, or a combination of the following devices:

  • Windows computer
  • Mac computer
  • Linux computer
  • iOS devices
  • Android devices
  • Windows mobile devices
  • Blackberry devices

And when dealing with these devices, not only do you need different printer drivers for different operating systems, you also need to keep updating the drivers to the latest version.

When managing the apps or drivers for the your devices, you may face the following problems:

  • Drivers not updated on the device
  • Drivers not supported (for example, for Windows XP)
  • Drivers not available (for example, for Linux devices)

When you want to print an important file, you may run into many problems which can be very frustrating. Not to mention the fact that your computer needs to be physically connected to your printer, or at least to your network. In a ‘Mobile World’, this may not be true anymore.

Thinking about these issues, I thought about the characteristics of my ideal printer:

  • Never needs updates – I don’t want to waste my time updating my drivers.
  • Is OS agnostic – the driver must work on all operating systems.
  • Is device agnostic – the driver must work on all devices.
  • Is printer agnostic – I don’t want to upgrade the driver even when I upgrade the printer.
  • Is network agnostic – the driver must work across networks or even over the Internet.
  • Is secure – the driver must be secure over the network or the Internet.
  • Is self-fixing – the bugs in the driver must be fixed automatically by the printer manufacturer.

I was wondering if there could be a driver that fulfills my stringent criteria. And then, I found my ideal printing solution – Google Cloud PrintGoogle Cloud Print lets me print from multiple devices and even print over the Internet!

GPC_Simple

All you need to make it work is a Cloud Ready Printer, an Internet connection, and a Google (Gmail) account.

How do I connect my printer to Google Cloud Print?

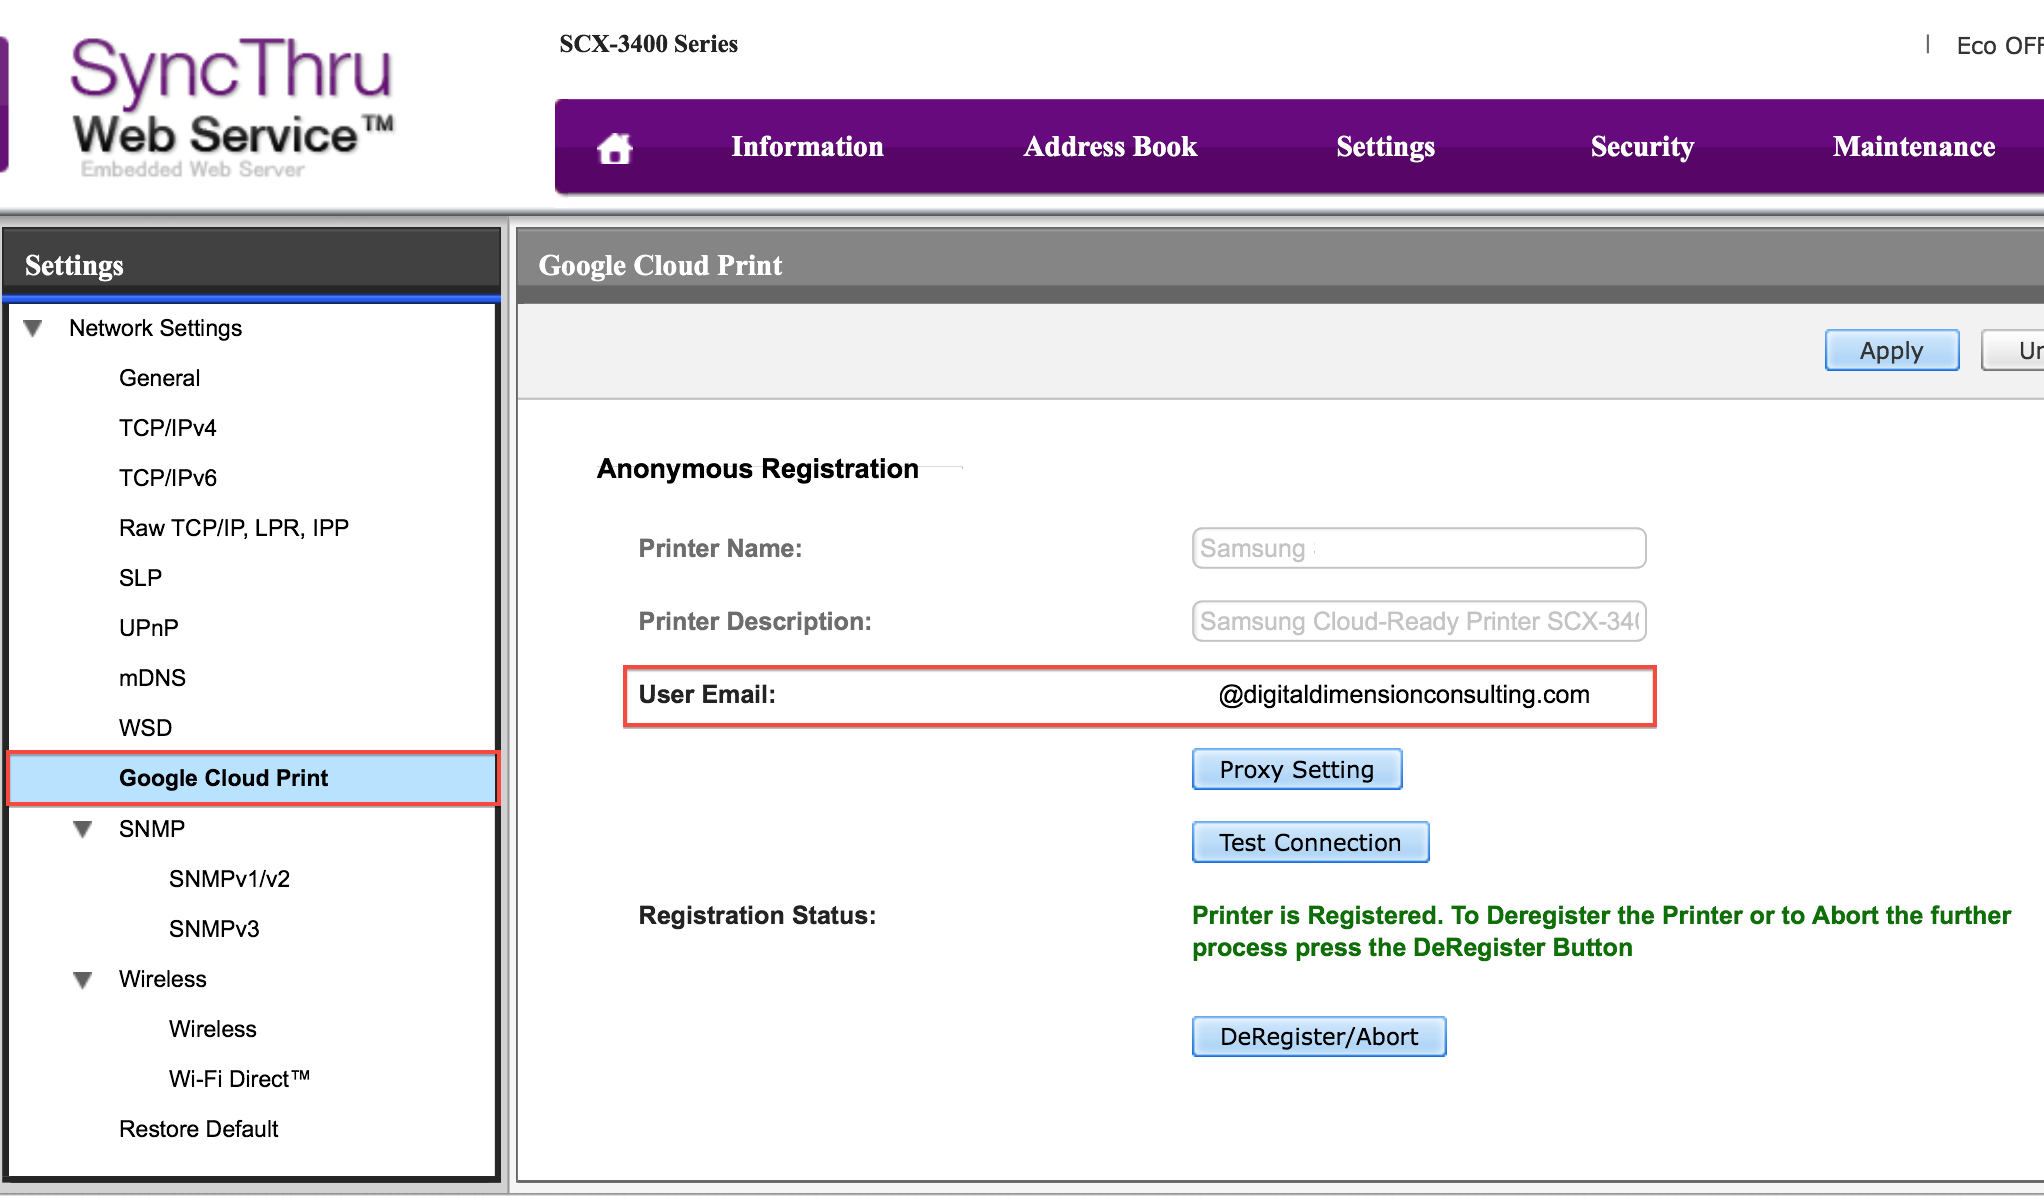
Make sure your printer is ‘Cloud Ready’. Most network or Wi-Fi printers are Cloud Ready these days. For example, the Samsung SCX 3405FW. Here are a few simple steps to connect your printer to Google Cloud Print:

1) Connect the Cloud Ready printer to your router over Wi-Fi or via ethernet.

2) Logon to your printer through a browser. The URL will be something like http://192.168.x.x. Once you enter the user name and password to logon to the printer, you will be presented with a dashboard to configure the printer settings. (Check the printer’s user guide for its user name and password.)

3) Go to the Google Cloud Print option. (Check the printer’s user guide for the exact location of the Google Cloud Print setting.)

4) Enter your Google (Gmail) user name and password. This step authorizes your printer to receive print jobs from Google Cloud Print.

5) After configuring your printer to receive print jobs from Google Cloud Print, your Google email will be displayed as the registered email.

GCP_Printer_Dashboard

How do I print a document using Google Cloud Print?

Once your computer is connected to Google Cloud Print, download the Cloud Print app on your mobile device. You can then print any file from any device over the Internet or local network. Here are a few steps to print any file on an Android device:

1) Open Cloud Print. Click Local > Files to access files available locally on your phone.

Cloud_Print1

2) Select any file and confirm the print action.

Cloud_Print2

3) Modify the Page Setup and print the file.

Cloud_Print3

The file is immediately printed over the Internet!

If you have multiple devices, with multiple operating systems, you need not worry anymore. Google Cloud Print automatically manages the drivers for all devices. All you need is a Cloud Ready printer connected to the Internet.

With Google Cloud Print, you never have to update the printer drivers. Even if you change your printer, you never have to reinstall the drivers. The only thing you need to do is ‘authorize’ your printer to accept print jobs from Google Cloud Print.

Is Cloud Printing useful for business?

Google Cloud Print could be a game changer for IT departments in small business. With Google Cloud Print, small businesses could avoid having a computer at various warehouse locations and just schedule a print job over the cloud.

Consider a hypothetical small business selling cosmetics to a small customer base across a distributed geographic location:

gcp-1
  • The mobile sales teams in various shopping malls (or the branch office) accept orders and send the print jobs to the cloud ready warehouse printers.
  • The warehouse employee creates a package and pastes the shipping label on the package.
  • Since warehouses do not have computers, there is no computer maintenance required.
  • Google Cloud Print not only saves money for small businesses, but also reduces the hassle of managing computers in multiple locations.

It’s really cool isn’t it? It’s time you upgraded to a printer that supports Google Cloud Print. Because, printer drivers could soon become extinct. It would be interesting to see how Google Cloud Print evolves in future. I would’t be surprised if Google adds multiple features like Cloud Scan or Cloud Fax considering the fact that most Cloud Ready Printers are Multi-function printers (printer, scanner, fax, and copier). 

The next time you want to print an important document, don’t wait till you get home. You could print remotely when you are on your way home in your car or on the train. Better still, you could print from halfway across the world, and your printer will still finish the job right away like a humble minion.

Advertisement

Managing Mobile Devices at Home

I am sure most of us have multiple mobile devices at home, such as smartphone, a tablet, or the distant cousin of the smartphone and tablet – the phablet. These mobile devices may be a combination of iOS, Android, and Windows Mobile.

With our kids, spouse, and parents using mobile devices, it becomes imperative for us to manage all these devices from a single interface. Especially with less technical users, it is important to manage tracking, apps, and other settings on the devices for them.

The Questions

When managing these mobile devices at home, there are some questions that plague us quite a bit, such as how do I:

  • Track my devices: Where are the devices right now? Where have the devices been?
  • Monitor my devices’ data: How do I monitor call history, Wi-Fi networks that the device has connected to, and Apps installed on the device?
  • Manage apps on my devices: How do I install an app on all my devices remotely? Can I delete Apps from my devices remotely?
  • Protect my devices: How do I enforce a Password Policy, remotely lock, or remotely wipe the device?

The Problem

Unlike corporate IT departments, we don’t really have a budget for advanced Mobile Device Management (MDM) solutions. So, in effect, here’s my problem:

  • I want to manage my mobile devices at home (for my family).
  • I have no money to buy an MDM solution for my home.
  • I don’t really have the training required to use an MDM solution.

The Solution

The answer to my problem is the Mobile Device Management solution by a company called 3CX. This MDM solution is cloud-based and so there is no installation required except on the mobile devices you want to manage. The 3CX Mobile Device Management solution is easy to use, has a web-based interface, and lets you manage up to 5 devices for free.

Setting up the MDM

Here’s how I set up the MDM solution on my devices:

  1. Go to http://www.mobiledevicemanager.com/ and sign-up. To activate the account, click the link in your email.
  2. Download and install the 3CX MDM App on the Android and iOS devices. When prompted, I logged in using using the credentials I created in step 1.
  3. Go to http://www.mobiledevicemanager.com/ from any browser and log in. Go to the Pending Approval node and approve the devices.

(For more information, refer to the 3CX getting started guide. It’s concise and well written.)

And Voila! The devices are visible on the web-based dashboard.

1Dashboard

The interface is clean and easy to navigate. I’ll talk about a few cool features of the MDM solution. I’ve added some screenshots of the MDM solution. You can click the images for a larger view.

Managing Mobile Devices

The Devices node lets you manage all your devices from a single interface. As you can see, both my devices are listed. One interesting feature is that the node shows you the last time when your device checked-in.2a_Device_List

Click the device you want to manage. For this example, I clicked the Android device. A few critical icons appeared as soon as I clicked the device. I’ll talk about a few important ones:

0_Device_List_Icons

  • Messaging – you can send a message to the device directly from this interface.
  • Lock – you can lock the device remotely.
  • Unlock – you can unlock the device remotely. You can also set a passcode.
  • Wipe – if the device was stolen, you can wipe the data on the device remotely.

The following tabs show a lot of useful information.

Map tab – displays the current location of the device.

2b_Map

The Info tab shows useful information about the device. I found it interesting that it was able to tell me if the device was charging or on battery. Interestingly, it displayed the memory and CPU usage too!

2c_Info

The Applications tab shows the list of applications installed on the device.

2d_Applications

The Location History tab shows all the locations where the device traveled to in a certain time frame. The grid shows a time stamp, address, and location co-ordinates. The location is accurate to a few meters. 2e_Location_History

The Call History tab shows a list of all outgoing and incoming calls with the duration.

2f_Call_History

The Policy tab lets you manage the usage policy. You can also enforce a password policy, if necessary.2g_Policy

The Wi-Fi tab shows all the Wi-Fi networks the devices connected to in a certain time frame. Interestingly, it also displays the security type and the visibility of the Wi-Fi networks that the device connected to during those times!

2h_WIFI

The Email tab lets you configure an email account on the device remotely.

Email_Tab

Navigation

The MDM has a Tree pane and an expandable node for easy navigation. You can expand nodes that have one or more sub-nodes.

3Nodes

Depending upon the node, the following information is available:

  • Dashboard –  a snapshot of the managed devices.
  • Devices – list of managed devices and detailed information shown through various tabs as described in the previous section.
  • Pending Approval – lets you approve the devices before managing them.
  • Group Policies – lets you define the behavior of certain settings. For example, your Password Policy.
  • Messages – lets you send messages to online devices.
  • Users – lets you add, modify, or delete users.
  • Alerts – lets you configure alerts for various actions performed by the device or the user.
  • App Management – lets you manage the Apps on the devices. (I will explain App Management further in this post).
  • System – settings for the Administrator.
  • Resources – help files and other useful links.

Alerts

The 3CX MDM lets you configure alerts based on various actions. Here is how the alert configuration screen looks:

4Alerts

App Management

I have saved the best for the last. App Management, in my opinion, is the most important feature of this solution. Expanding the App Management node shows these other sub-nodes:

5a_App_Management

1) Installed Apps – shows the list of apps installed on your managed devices. You can select a particular app and click Remove Application to remove the app from the device.

5b_Installed_Apps

2) App Repository – shows your own App Repository. You can create your own App Repository by adding apps from iTunes or Google Play store. You can use this repository to quickly install apps onto the managed devices. For example, if you are going to Disney world, you can add the Disney app to the repository. You can then easily deploy this app onto the devices used by your family.

5c_App_Repository

Once you have an app to the App Repository, go to Devices > [Your Device Name] > Applications (tab) > Add from Repository (button) and select the app from the dialog that opens. Select the App you want to deploy to the device and click Add.

Add_From_Repository

3) Whitelisted Apps – users of your mobile devices are allowed to download these apps. For example, I added the weather app as a Whitelisted App. The users of my managed mobile devices can now install the weather app. 5d_Whitelisted_Apps

4) Blacklisted Apps –  users of your mobile devices are not allowed to download these apps. For example, I added a poker app as a Blacklisted App.

5e_Blacklisted_Apps

Conclusion

Homes and people are now connected via mobile devices. With more and more devices entering our homes, the safety, security, and management of our mobile devices become a critical task. Consequently, Mobile Device Management solutions are not meant for corporates alone. Homes need MDM solutions too. Needless to add, you are now the IT administrator of your connected home.

Disclaimer: The Digital Dimension of Technology is an independent non-commercial technology blog. We have not been endorsed by 3CX. 

Going beyond the device: Expanding the horizons of Super Zoom

Have you ever pushed your device to the limit? Have you ever made your device do what it was not meant to do, like over-clocking your CPU or Jail-breaking your iPhone? I just did something like that. Only it’s something much safer than over-clocking or jail breaking. And I did it to my camera.

I have been using a Super Zoom camera for a while now. A super zoom camera comes with a lens that can go from a Wide Angle to Super Zoom. The Canon SX 40 HS is a good example as it can go from 24mm (wide angle) to 840mm (super zoom).

There are some advanced features that are not available in a Super Zoom. One of the most important missing features is a Remote Shutter Release option. Some DSLRs come with a Wireless Shutter Release option where you can mount your camera on a tripod and take the picture without touching the camera.

Many a time I’ve really really needed a Remote Shutter Release option. For example, when I take photos of the Moon/Super Moon or when I take artsy pictures at night. My super moon picture:

Downtown Vancouver at night:

[For more photos, visit my Photo Blog]

In such cases, I have either zoomed in quite a bit, or am taking the picture in low light conditions. The slightest shake translates into a very bad picture. To avoid shaking the camera in such cases, I usually activate the 10 second timer. But there is some residual oscillation (shake) which sometimes messes up the photos. Reading the camera’s user guide told me that that there was no inbuilt no Remote Shutter Release option available. I also visited many specialty camera in the hope of finding an external device that could act as a remote shutter release. To my utter disappointment, I could not find such a device.

Then, one fine day, I discovered CHDK – Canon Hack Development Kit. This is an open source community that creates programs for Canon cameras to add capabilities in addition to the existing features, for example, a Remote Shutter Release option. So, I decided to build my own Remote Shutter Release kit. Here’s what I did:

(A) Installed CHDK on my camera (the easy part)

To install CHDK:

  1. Go to the http://chdk.wikia.com/wiki/CHDK
  2. Check the firmware version on your camera.
  3. Download the correct build based on the firmware version. Unzip it on your computer.
  4. Copy the CHDK files on the SD card.
  5. Insert the SD card in the camera and press the Review button.
  6. Go to  Menu and update the firmware.

The program is loaded into the memory temporarily. When you shut off the camera, it is removed from the memory. The program does not interfere with the manufacturer’s original firmware. CHDK also provides a detailed user guide.

(B) Created a physical Remote Shutter Release device (the most difficult part)

I searched the Internet and discovered that I have to build a remote shutter release device on my own. I found a great video of a camera user who had built a shutter release device from scratch. I could not follow the same path since I am not as tech savvy. Imagine the trouble if I were to solder a diode onto a circuit!. Moreover, being a technical writer by profession, I believe in simplicity. I wanted a solution that was simple, easy to implement, easy to use, and of professional quality. I could not build a remote shutter release device, and nobody sold one for my camera. It seemed like a dead end.

Numerous searches on the Internet provided no answers. However, I discovered a few things that helped me create a solution for myself:

  • Send > 4V on the data port of the camera to release the shutter.
  • A very high voltage (> 8V) might damage the camera!

I performed some trial-and-error experiments and discovered a very simple solution for the problem. I used the following readymade components:

  • Duracell USB Battery Backup: I used the Duracell USB Battery Backup to experiment with the Remote Shutter Release feature of CHDK. The Duracell USB Battery Backup is rechargeable, has an ON/OFF switch, and is slightly bigger than a matchbox. It has a USB (output) port for charging external devices and a mini-USB (input) port for charging the backup battery.

  • Mini-USB cable: I used a mini-USB cable for the solution. You can easily use the data cable that came with the camera.

(C) Made the hardware and software work together

To make the hardware and CHDK software work together:

  1. Install CHDK on the SD card and update the Firmware [as explained in (A) above]. Once CHDK is in the memory, go to the CHDK menu and enable Remote Shutter. (Print button + Menu button displays CHDK menu.)
  2. Connect the mini-USB cable to the camera’s data port and the other end to the USB port on the Duracell USB Battery Backup.
  3. Switch ON the Duracell USB Battery Backup and Switch OFF immediately. The camera focuses.
  4. Switch ON the Duracell USB Battery Backup and Switch OFF immediately again. The camera releases the shutter!

And I am sure this solution will not damage the camera. Here’s the simple reason why: The camera is designed to use a mini-USB cable that is connected to a computer’s USB port (which has a ~4V output). The Duracell USB Battery Backup also has the same output since it is basically a USB port without the data transmission capabilities.

I was amazed that another device could work as a remote shutter release for a camera that was not built to use one! Amazon, eBay, camera stores, and photography forums did give me ideas for creating this seemingly simple solution. So I thought I must share this discovery with all the other Super Zoom users out there that are also looking for something similar.

Happy Super Zooming!

More information about the Duracell USB Battery Backup: http://www.duracell.com/en-US/product/instant-usb-charger.jspx

Update: May 12, 2012: If you want to use a clicker-like device, the iGo Anywhere USB Micro/Mini Charger would be ideal. Instead of a switch, you could use the button to release the shutter. For more information about iGo Anywhere USB Micro/Mini Charger, visit the Source website here. I tested it out and it works perfectly fine.